Great Divide Mountain Bike Route

Great Divide Mountain Bike Route Jasper, AB to Antelope Wells, NM 7 Map Set GPX Data | Overview | Buy | Mobile App
1. CANADA - Jasper, AB to Roosville, MT Detail
2. Roosville, MT to Helena, MT Detail
3. Helena, MT to Colter Bay, WY Detail
4. Colter Bay, WY to Rawlins, WY Detail
5. Rawlins, WY to Salida, CO Detail
6. Salida, CO to Grants, NM Detail
7. Grants, NM to Antelope Wells, NM Detail

Great Divide Map ImageIn 2018, for the 20th anniversary of the Great Divide Mountain Bike Route, we completely redesigned the maps. They now feature shaded relief, consolidated narratives that may be cut off and carried separate from the maps, a UTM and lat/long grid, point to point mileages and the often requested south to north narratives. We also upped the scale to show greater detail aiding your navigation, especially helpful on many of the lesser known roads and trails this route showcases.

Ride the longest off-pavement route in the world.

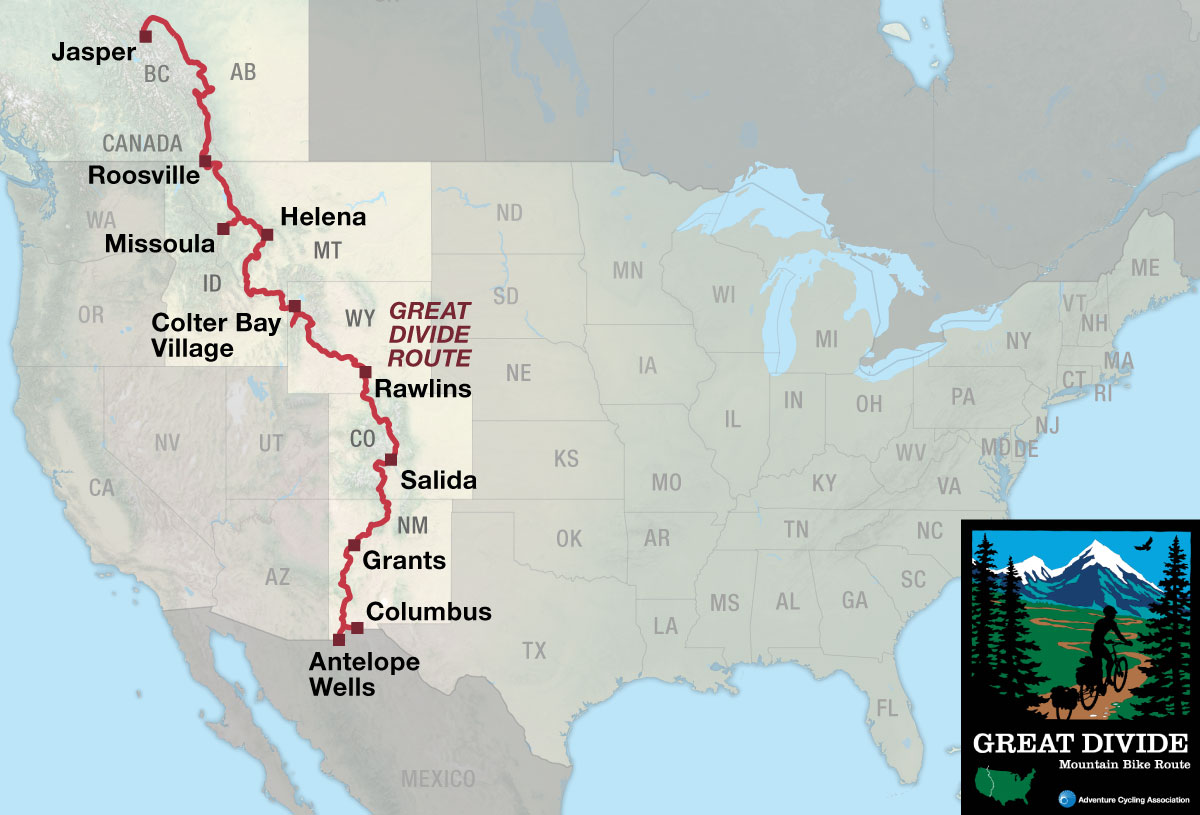
The Great Divide Mountain Bike Route (GDMBR) is Adventure Cycling’s premier off-pavement cycling route, crisscrossing the Continental Divide in southern Canada and the U.S. This route is defined by the word “remote.” Its remoteness equates with spectacular terrain and scenery. The entire route is basically dirt-road and mountain-pass riding every day. In total, it has over 200,000 feet of elevation gain. Nearly 2,100 miles of the route is composed of county, Forest Service, Bureau of Land Management (BLM), and Canadian provincial unpaved roads. The remainder is 60 miles of singletrack trails and 950 miles of paved roads including close to 50 miles of paved bike paths.

Highlights from the Great Divide Mountain Bike Route

The route is geographically divided into five regions. The diverse nature of the regions makes for an incredible visual, sometimes spiritual experience. The route offers something different every day — whether it be riding conditions, scenery, points of interest, or folks along the way. It is a route to be enjoyed for its diversity.

A wide variety of road conditions exists along this route. Surfaces range from pavement, good gravel roads, four-wheel-drive roads, singletrack, or old railroad beds. There is an excellent opportunity to view wildlife such as bear, deer, wild horses, pronghorn antelope, eagles, osprey, sandhill cranes, and other birds and animals. The route is rich in history, with ghost towns, deserted mines, wagon routes, and old Spanish land grants. The route is near or goes through several national parks such as Glacier, Yellowstone, and Grand Teton. Temperatures tend to be chilly at night and cool to warm in the days as you are in mountainous regions most of the way. Wind really isn’t a factor along the route because you spend a lot of time in the cover of trees, with the exception of the Great Basin area. Snow, hail, and afternoon thundershowers can be a factor. Getting up and riding early to avoid the afternoon thundershowers is advisable. Medical help is often a long distance off of the route, so riding within your abilities and being aware of dangers is a must. Mosquitoes are a fact of life — take repellent.

Great Divide Canada, which connects to and extends the U.S. Great Divide Mountain Bike Route northward, showcases some of the most magnificent scenery in the entire Rocky Mountain chain. Paradoxically, the route feels somewhat more settled, or civilized, than many sections to the south in the United States. One reason for this is that Great Divide Canada passes through a string of national and provincial parks, which, not surprisingly, attract a great number of visitors.

Beginning in Jasper, the route counterintuitively runs north to Hinton before heading southward toward Canmore. The paved Legacy Trail brings riders into Banff and through spectacular scenery to Peter Lougheed Provincial Park. From there, a tough climb up and over the Great Divide via a powerline route through the Elk Pass delivers you to Elk Lakes Provincial Park. It’s a six-mile ride from one trailhead to the other that would require more than 200 miles of driving if you had to do it in a car on roads!

The main route rolls onto the Elk Valley Trail beginning in the tiny community of  Round Prairie and follows portions of it on-and-off to the town of Elko. The 80-mile EVT consists of back country roads, singletrack and community trails. Before you reach its end, the booming ski-resort town of Fernie makes a great place for a layover, with its copious motels, sporting goods stores, restaurants, and hiking/mountain-biking trails.

South of Fernie, you can continue on the main route or choose to ride through miles of unbridled wilderness on the Flathead Alternate. Make your choice wisely because the alternate route is extremely remote. It runs through a scenic drainage called the “Serengeti of North America” by biologists for its unrivaled wildlife populations, and it’s the last major valley in British Columbia to be completely undeveloped. The rolling road following the Flathead River is known to locals as “Grizzly Bear Highway” so be very “bear aware.” Along the main route, a dizzying and delightful series of paved and gravel byways, one of which proffers a brief glimpse down on the immense Lake Koocanusa, then wend their way to Grasmere. From there, it’s a seven-mile ride on the highway to the international border and the northern terminus the U.S. route.

Beginning at the Canadian border and heading south to Helena, Montana, you are in the deep woods and steep mountains near Glacier National Park and the Bob Marshall Wilderness. This area is native to grizzly bear, elk, moose, mountain lion, thick woods, and has some difficult climbing. Montana is characterized by mountainous riding in tall forests with occasional dips into small towns. It is also noted for its friendly people. The capital city in Montana, Helena, has less than 40,000 people and a nice small-town feel to it. The other big town along the route is Butte, which has a definite blue-collar, mining flavor. Montana also has the toughest downhill on the route — nicknamed “thermarest hill” for all the thermarests it has eaten. Even the hardiest riders have to walk this one.

From Butte to Pinedale, Wyoming, you’ll be riding through wide-open mountain valleys. The vegetation thins out into valleys with many different varieties of sage and high-elevation alpine woods. The route crosses the Continental Divide many times, and the climbing is longer with very steep sections on some of the roads. You’ll see many cows. You leave Montana crossing the divide into Idaho. You are only in Idaho for 76 miles and ride along some blue-ribbon fishing streams and an old railroad bed on the west side of Yellowstone National Park. You’ll cross into Wyoming between Yellowstone and Grand Teton National parks on a very scenic road with some great backcountry campsites and a genuine undeveloped hot springs. The route cuts through a corner of the Tetons before heading east up over the divide again and then down the west side of the Wind River Range. The prettiest alpine region on the whole route can be found here. Just south of Pinedale, is a stretch with the worst mosquitos on the entire route but makes for a great character builder. Farther on there’s the unforgettable sensation of riding on the crest of the divide for several miles. You then hit an extremely picturesque section of high desert following the Lander cutoff — part of one of the westward wagon routes. Water is very scarce through here, so carry plenty. After dropping into the twin ghost towns of South Pass and Atlantic City, you will cross the Great Basin — a place of almost no drinkable water and no trees. Big northwest winds blow across vast open territory marked with wild horses and antelope. Rawlins, Wyoming, marks the end of the desert.

From southern Wyoming to northern New Mexico, you’ll be in the Colorado Rockies. The ascents on the route stretch out to long mountainous climbs at elevations starting at 8,000 feet or above. Incredible aspen stands, huge mountains, beautiful alpine meadow flora, historical tourist towns, and a less remote wilderness setting are the characteristics of this state. Expect early evening thunderstorms and cold nighttime temperatures. The highest pass of the route is Indiana Pass, elevation 11,910 feet, in southern Colorado. Soon after crossing it, you get to see firsthand what kind of scars mining can leave on the land as you pass right through a federal Superfund site. Heading into New Mexico, the road surface deteriorates, with much more rocky riding. Here the countryside turns much drier, and water sources can be few and far between. Climbs get shorter and steeper. Geographically this region is as remote as any place in the continental United States. Mesas, cliff lines, volcanic formations, and mountain ranges that seem to pop right out of the desert floor are major visual features of this area. Many different cactus and grass varieties somehow provide habitat for small rodents, snakes, and lizards. Townspeople are right out of Old Mexico, with Spanish spoken more than English. Late-summer monsoon rains turn roads into sloppy, red clay and can fill many of the dry creek beds on the route in seconds. Roads are impassable until they dry out. This area is both historically and anthropologically dominated by the rich Native American and southwestern Spanish culture. Coming down the east side of the Gila Wilderness is a welcome relief, with water once again available as you head into Silver City, New Mexico, a place noted for learning about Anasazi culture with the Gila Cliff Dwellings National Monument north of town and a good museum at the local university. From there it is a sprint south (mostly on pavement) to the border crossing, which consists of one building on the border and nothing else for miles and miles.

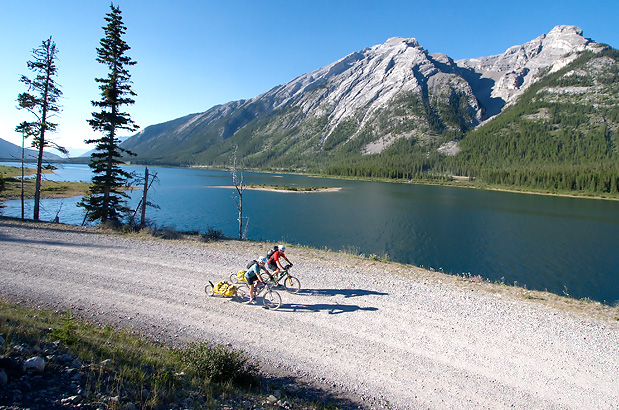
Photo by Aaron Teasdale

The elevations encountered on Great Divide Canada are relatively low when compared to those along the Great Divide route in the central Rockies of the United States, where riders must tackle mountain passes of nearly 12,000 feet above sea level. The high point on Great Divide Canada, Elk Pass, is a mere 6,443 feet. Generally, road quality is quite good, although you’ll find that surfaces range from smooth pavement to rutted dirt, where you’ll be thankful that you’re riding a mountain bike and not a road bike. As a rule, if you’re not riding uphill, then you’re headed downhill.

With the exception of the Great Basin in Wyoming, you will be either gaining elevation, or descending, for the entire route. The elevations are lower in Montana — building up to the highest passes in Colorado and then tapering back off in New Mexico. However, some of the toughest climbs are in Montana and New Mexico because of the steepness and the poor road quality. And in New Mexico you’ll be carrying extra food and water for the serviceless stretches.

Great Divide Mountain Bike Route - Main Route
Section Distance Elevation Total Climb Avg. Climb/mile
Total 3086.4 miles Minimum: 2,565 ft.
Maximum:11,950 ft.
207,870 ft. south bound
206,480 ft. north bound
67 ft. per mi. south bound
67 ft. per mi. north bound
1 585.1 miles Minimum: 2,485 ft.
Maximum:6,410 ft.
38,955 ft. south bound
39,660 ft. north bound
67 ft. per mi. south bound
68 ft. per mi. north bound
2 371.1 miles Minimum: 2,565 ft.
Maximum:6,840 ft.
28,495 ft. south bound
26,975 ft. north bound
77 ft. per mi. south bound
73 ft. per mi. north bound
3 453.3 miles Minimum: 4,030 ft.
Maximum:7,915 ft.
30,150 ft. north bound
27,450 ft. north bound
67 ft. per mi. north bound
61 ft. per mi. north bound
4 365.5 miles Minimum: 6,520 ft.
Maximum:9,665 ft.
19,350 ft. south bound
19,405 ft. north bound
53 ft. per mi. south bound
53 ft. per mi. north bound
5 377.8 miles Minimum: 6,525 ft.
Maximum:11,500 ft.
29,350 ft. south bound
28,900 ft. north bound
78 ft. per mi. north bound
76 ft. per mi. north bound
6 539.2 miles Minimum: 5,880 ft.
Maximum:11,950 ft.
41,740 ft. south bound
42,335 ft. north bound
77 ft. per mi. south bound
79 ft. per mi. north bound
7 394.4 miles Minimum: 4,315 ft.
Maximum:8,290 ft.
19,830 ft. south bound
21,755 ft. north bound
50 ft. per mi. south bound
55 ft. per mi. north bound
Great Divide Mountain Bike Route Alternates
Name Section Distance Total Climb Avg. Climb/mile
Flathead Alternate CANADA 93.0 miles 9,400 ft. south bound
9,780 ft. north bound
101 ft. per mi. south bound
105 ft. per mi. north bound
Cadomin Alternate CANADA 48.0 miles 4,045 ft. south bound
3,530 ft. north bound
84 ft. per mi. south bound
74 ft. per mi. north bound
Canmore Cutoff CANADA 6.9 miles 1,475 ft. south bound
320 ft. north bound
214 ft. per mi. south bound
46 ft. per mi. north bound
High Rockies Alternate CANADA 31.2 miles 4,050 ft. south bound
4,025 ft. north bound
130 ft. per mi. south bound
129 ft. per mi. north bound
Missoula Spur 1 65.4 miles 6,845 ft. south bound
7,950 ft. north bound
105 ft. per mi. north bound
122 ft. per mi. north bound
Rimini Alternate 1 12 miles 2,040 ft. north bound
345 ft. north bound
170 ft. per mi. north bound
29 ft. per mi. north bound
Boulder Alternate 2 33.4 miles 2,315 ft. south bound
1,570 ft. north bound
69 ft. per mi. south bound
47 ft. per mi. north bound
Divide Alternate 2 18.3 miles 680 ft. south bound
760 ft. north bound
37 ft. per mi. south bound
42 ft. per mi. north bound
Fish Creek Alternate 2 42.7 miles 2,490 ft. south bound
3210 ft. north bound
58 ft. per mi. south bound
75 ft. per mi. north bound
Jackson Spur 3 40.8 miles 960 ft. south bound
1536 ft. north bound
24 ft. per mi. south bound
38 ft. per mi. north bound
Wind River Alternate 2 13.3 miles 1,390 ft. south bound
740 ft. north bound
105 ft. per mi. south bound
56 ft. per mi. north bound
Columbine Alternate 4 35.6 miles 3,730 ft. south bound
2535 ft. north bound
105 ft. per mi. south bound
71 ft. per mi. north bound
Chaco Alternate 5 117.4 miles 4,490 ft. south bound
4,870 ft. north bound
38 ft. per mi. south bound
41 ft. per mi. north bound
El Malpais Alternate 6 38.4 miles 1,300 ft. north bound
690 ft. north bound
34 ft. per mi. north bound
18 ft. per mi. north bound
CDT Alternate 6 11.4 miles 2,075 ft. south bound
965 ft. north bound
182 ft. per mi. north bound
85 ft. per mi. north bound
Columbus Alternate 6 47.0 miles 625 ft. north bound
1,125 ft. north bound
13 ft. per mi. north bound
24 ft. per mi. north bound

This route can be ridden anytime from early summer to mid-fall (typically June to October). Be aware that snow can occur at any time along the route. If it is a heavy snow year, high-elevation roads in the north may not be open until late June or early July.

We discourage you from attempting to ride this route solo; in fact, a minimum group size of three is strongly recommended. If a rider is debilitated in the backcountry, you will want to have at least one person to stay with the injured/sick rider, and another to go for help. Cellphone reception is still very spotty along much of the route.

Because June is typically a wet month in the northern Rockies, and often a cold one at the higher elevations, we recommend that you do not attempt to ride prior to late June or early July. High-country snowpack may prevent certain portions from being passable until then, anyway. Concerning the other end of the cycling season, plan on being off the route by mid-October at the latest. Regardless of when you strike out or how long you intend to be there, pack along raingear and cold-weather clothing. Snow or cold rain is possible any day of the year at some of the elevations encountered, and hypothermia is an ever-present possibility.

Remote Terrain Equals Limited Services

The remoteness of this route translates to long stretches of country without basic services, particularly emergency services. All services are minimal at best, except near larger towns, and cell phone coverage is only about 5 percent of the route. About one third of the overnights are characterized as undeveloped wilderness sites, and most others are Forest Service sites with pit toilets and a water source. Food sources are usually small-town establishments, convenience stores, and campground groceries with limited supplies. Towns are spaced every two to three days along most of the route. They tend to be extremely small and often have limited services. It is necessary to be flexible in what you eat. Showers, flush toilets, drinking water, and laundromats are sometimes widely spaced. It is good to have some back-country camping experience before riding the Great Divide to know how to minimally impact the land. The Great Basin in Wyoming and New Mexico both call for long-mileage days and carrying food and water for several days at a time.

Great Divide Canada features some of the most magnificent and forbidding mountain country you’ll ever see — anywhere. You’ll need to deal with a couple of long stretches without basic services. Careful planning will be required to ensure that you have enough food to get you through (though surface water and primitive campgrounds are plentiful). With the exception of large grocery stores in Jasper, Banff, Sparwood, and Fernie, you’ll find food sources to be small-town establishments, often more akin to convenience stores than to supermarkets; consequently, you may find it necessary to exercise flexibility when it comes to menu planning. Also be aware that showers, flush toilets, potable water, and laundromats can be few and far between. It’s wise to have some back-country camping experience before riding Great Divide Canada, and you’ll also want to know the recommended precautions to take when camping and traveling in bear country.

You should also carry bear repellent, available at sporting goods stores in the larger towns of Canada and Montana, and become familiar with its safe and proper use. Always be bear-aware, and follow these rules when camping:

  • Store all food, garbage, and other attractants in a bear-resistant manner, well away from your tent. This can include hanging them in a stuff sack from rope slung over a high, isolated tree branch, or storing them in a bear-proof container provided at some campgrounds.
  • Attractants such as food leftovers, fish entrails, and bacon grease should not be buried or burned in campfires. Leftover food and waste should be placed in a sealed bag or container and packed out with garbage. If leftover food or other attractants must be burned, do so in a contained fire stove or in an appropriate container over a campfire, then pack out the ash.

Some campgrounds will charge a cyclist traveling alone less if they have hiker/biker sites, but often they will charge the price of a regular tent site, and that can easily be $10-$20/night. If you’re friendly and ask around, you can often get yourself invited to camp in a yard. In national forests you are allowed to camp anywhere on national forest land as long as you “pack it in, pack it out.” Many city parks are free to camp in.

You may also wish to sign up with Warmshowers, a reciprocal hospitality site for bicycle travelers, for other overnight options.

Tough on Equipment

The Great Divide Mountain Bike Route is extremely hard on equipment. The weight of your gear exponentially multiplies the stress of riding steep, fast, rough downhills. Wheels, tires, and drivetrains (chains, cassettes, bottom brackets, chainrings) take a lot of abuse and might need replacing along the course of the entire route. Suspension equipment on the bicycle helps to mitigate the abusive nature of the terrain. That said, nylon pivots of some full-suspension bikes wear out extremely fast and are not recommended. Suspension seatposts, good handlebar grips, and front-suspension forks help smooth out the many miles of washboarded and chuckholed roads. Weighting a suspension fork with panniers works well, evens the weighting of the bike, and adds little extra stress to the fork. Trailers also work well and lighten the rear triangle of the bike.

Well-made camping gear is essential for the many nights of high-elevation cold, dew, and rain. A well-ventilated, free-standing, three-season tent covered by a rainfly with ample vestibule space and a “footprint” ground tarp is a must. Sleeping bags should be rated to below 20 degrees Fahrenheit, and inflatable mattresses add comfort and warmth. A lot of effort must be taken to keep your possessions dry. Pannier covers, dry bags, and plastic freezer bags all work well to keep the rain and dew off clothing and gear. Good rain gear is also essential.

A high-quality water filter is mandatory; advisably, carry one filter per person in your party. Surface water should be ingested only after running it through a good water filter.

From Salida, Colorado south to the Mexico border, puncturevine or goat’s-head (Tribulus terrestris L.) is an invasive plant species that produces thumbtack-like burs capable of puncturing bicycle tires. We highly recommend protecting tires against “goathead thorns” in one of three ways:

1. Sealant-filled or thorn-resistant tubes;

2. Tubeless tires with at least 3oz of sealant per tire;

3. Tire liners, such as Mr. Tuffy tire liner strips.

As for a tire recommendation, we recommend a 2.25” width with a low-profile tread pattern and thick sidewalls.

Shuttles

If you’re in need of a shuttle to complete your Great Divide trip, download our Great Divide Shuttle Options (pdf) for suggestions.

Route Highlights

Great Divide Shuttle Options

Great Divide Shuttle Options PDF

Great Divide Highlights

  • Glacier National Park, Section 1
  • Pioneer Mountains Scenic Byway, Section 1
  • Red Rock Lakes National Wildlife Refuge, Section 2
  • John D. Rockefeller Jr. Memorial Parkway, Section 2
  • Yellowstone National Park, Section 2
  • Grand Teton National Park, Section 2
  • Aspen Alley, Section 3
  • Steamboat Springs, Colorado, Section 3
  • Summit County, Colorado, Section 4
  • Boreas Pass, Colorado, Section 4
  • Rio Grande National Forest, Colorado, Section 4
  • Tusas Mountains, New Mexico, Section 5
  • El Malpais National Monument, El Malpais Alternate, Section 5
  • Pie Town, New Mexico, Sections 5 & 6
  • Gila Cliff Dwellings National Monument, Section 6
  • Chihuahuan Desert, Section 6
  • Pancho Villa State Park, Columbus Alternate, Section 6

More Route Resources

TRAIL GUIDE

Great Divide Canada showcases some of the most magnificent scenery in the entire Rocky Mountain chain. Paradoxically, certain portions seem more settled, or civilized, than many sections of the route to the south in the United States. One reason for this is that Great Divide Canada passes through a string of national and provincial parks, which, not surprisingly, attract a great deal of visitors.

The route begins in spectacular Jasper National Park, first heading not south but in a north-northeasterly direction for more than 30 miles (48 km) – your first on-the-ground evidence that the Great Divide truly is a circuitous route and by no means the quickest way to get there from here. Once out on the rolling plains, the route veers southeast, traversing prairies and foothills at the eastern foot of the Rocky Mountains to a point about 30 miles (48 km) northwest of Calgary, where it turns west to take aim at the mountains.

Starting in Jasper, the quieter of the two main Alberta National Parks towns, you are immediately cast into the wilds on the historical Overlander Trail. This singletrack trail does include two short challenging sections of hike-a-bike that would require you to remove and portage a BOB trailer. Alternatively, a cyclist could ride TransCanada Highway 16, which has wide, bike-friendly shoulders, all the way to Hinton. Just south of Hinton you are presented with an optional route with the Cadomin Alternate. This option avoids Hinton and its services, but you will be rewarded with a route that puts you right into the Rocky Mountains and passes by the historical coal mining town of Cadomin. Whether you choose to stay on the main route through Hinton or follow the Cadomin Alternate you will soon begin heading generally southward, the route from this point to Canmore will look like a saw blade on the elevation profile as you climb and descend over many small passes and drop down through many watershed valleys. Resupply options between Hinton and Canmore are very limited and hours are sporadic for what few options you do have.

Camping options along this section are plentiful with numerous official campgrounds and many great areas for random camping. Be aware that certain official campgrounds along this section do have “no random camping” buffer zones around them that you are not permitted to camp in.

Riding conditions between TransCanada Hwy. 16 and PR 1A can vary significantly with time of year and weather conditions, as the majority is gravel forest service roads. Expect a mix of freshly graded, packed solid and washboarded sections. While this section is a major forest service road, the volume of traffic is generally low, but be aware of possible log hauling activities or oil and gas traffic.

Once you reach PR 1A you will ride a paved secondary highway into Canmore, be aware that there is a short section of this highway that has no shoulder and can be busy with traffic.

As you enter Canmore you are presented with another route option. Option 1 is to climb the spectacular but difficult (and often dusty and washboarded) Smith-Dorrien/Spray Lakes Rd. from Canmore to the Goat Creek trailhead. Option 2 has you following the paved Legacy Trail that connects Canmore to Banff.

From the bustling national park town of Banff, the Spray River West Trail – an old fire road, actually – whisks you into country possessing a very wild and remote feel. A climb up the Goat Creek Trail then takes you to the Smith-Dorrien/Spray Lakes Road, a primary and potentially dusty backcountry tourist route. From here riders have the option of using the main route that follows the unpaved road or the High Rockies Alternate. The singletrack High Rockies Trail (HRT) parallels the main route for 31.2 miles and ends at Lower Kananaskis Lake. There are numerous connection points from the main route to the HRT allowing riders to use a hybrid of the two routes if they choose. Note that travel along the HRT will be more slow-going than the main route. The terrain has more overall elevation change, and the trail is narrower (BOB trailers not recommended). There is also a scenic suspension bridge that provides a unique experience for those up for it, or trails can be used to bypass.The jaw-dropping scenery continues through Kananaskis Country and its Peter Lougheed Provincial Park. From there, a sustained climb up and over the Great Divide via a powerline route over Elk Pass delivers you to Elk Lakes Provincial Park. It’s a six-mile (9.6 km) ride from one trailhead to the other that would require more than 200 miles (322 km) of driving if you had to do it in a car, on roads!

Subsequently, you’ll continue on a dirt road to Round Prairie, where the route rolls onto the Elk Valley Trail (EVT), which it follows on-and-off through the ski-resort town of Fernie, continuing all the way to Elko. From Elko, a series of paved and gravel roads, one of which proffers a brief glimpse down on the immense Lake Koocanusa, wend their way to Grasmere. Then it’s a 7.5-mile (12 km) ride on the highway to the international border.

The recommended supplemental maps for this section include the Backroad Mapbooks volumes entitled “Canadian Rockies” and “Kootenay Rockies BC.” They can be ordered at www.backroadmapbooks.com or by calling (604) 521-6277.

In the Canadian Rockies, the best time to plan for a mountain bike tour is that sweet spot after the snow has melted up high, but before wildfire season begins in earnest. This typically means sometime between late June and late July. If you’re planning your trip six months in advance, shoot for this window. Concerning the other end of the cycling season in Alberta and British Columbia, plan to be off the route by late October.

Regardless of when you strike out or how long you intend to be out, pack along raingear and cold-weather clothing. Snow or cold rain is possible any day of the year at some of the elevations encountered, and hypothermia is an ever-present possibility. Also remain vigilant of the fact that this is bear country, so carefully review the information detailed under “Remote Riding Conditions.”

If you plan to enter Montana on the route from British Columbia (or vice versa), know that all U.S. citizens crossing the U.S.-Canadian border in either direction need one of the following: a passport, a U.S. Passport Card, an Enhanced Driver’s License (EDL), or a NEXUS card. Visitors who are not U.S. or Canadian citizens will also need a visa. Visa requirements vary from country to country, so check for specifics at advcy.link/visaUSCanada.

Those younger than 18: For entering Canada or the U.S., if you are not traveling with your parents, it is advisable to carry a letter stating that they have granted you permission to visit.

Take along sufficient funds and plan to exchange currency at a bank, since stores or restaurants often don’t give the full exchange rate. Canadian Customs will allow you to carry a two-day supply of food into Canada duty-free. You may find U.S. Customs less relaxed about the transportation of food across the border. Also, if you are carrying prescription drugs, keep them in the original container from your pharmacist.

For other questions pertaining to crossing the international border, call 406-889-3865 (Port of Roosville, MT); or 604-535-5450 (British Columbia).

Cadomin Alternate

Avoids the unpaved, remote Robb Rd. and provides access to services in the small town of Cadomin along Forestry Trunk Rd./PR 40.

High Rockies Alternate

Singletrack trail alternative to the potentially dusty and washboarded Smith-Dorrien/Spray Lakes Rd.

Flathead Alternate

A wilder option through the “Serengeti of North America”. Includes the notorious ascent (southbound) of “The Wall” out of the Wigwam River drainage. Services are extremely limited.

Canmore Cutoff

A shortcut from Canmore to Goat Creek, skipping the town of Banff.

Updated: May 31, 2023

Alert: Active Logging Notice

TRAIL GUIDE

This section of the Great Divide Mountain Bike Route traverses the heavily timbered mountains and historic mining regions lying between the Montana-British Columbia border and the Montana state capital city of Helena. For purposes of acquiring the recommended supplemental maps, note that the section traverses four national forests. They are the Kootenai National Forest (406-293-6211), the Flathead National Forest (406-758-5208), the Lolo National Forest (406-677-2233), and the Helena-Lewis and Clark National Forest (406-449-5201). You may obtain the forest visitor maps for these at the individual forest offices or by visiting advcy.link/NFmaps or calling 971-263-3149.

In the Northern Rockies, the best time to plan for a mountain bike tour is that sweet spot after the snow has melted up high, but before wildfire season begins in earnest. This typically means sometime between late June and late July. If you’re planning your trip six months in advance, shoot for this window. Concerning the other end of the cycling season in Montana, plan to be off the route by late October. Snow can start flying as early as late September.

Regardless of when you strike out or how long you intend to be out, pack along raingear and cold-weather clothing. Snow or cold rain is possible any day of the year at some of the elevations encountered, and hypothermia is an ever-present possibility. Also remain vigilant of the fact that this is bear country, so carefully review the information detailed under “Remote Riding Conditions.”

If you plan to enter Montana on the route from British Columbia (or vice versa), know that all U.S. citizens crossing the U.S.-Canadian border in either direction need one of the following: a passport, a U.S. Passport Card, an Enhanced Driver’s License (EDL), or a NEXUS card. Visitors who are not U.S. or Canadian citizens will also need a visa. Visa requirements vary from country to country, so begin your search for specifics at www.cbp.gov.

Those younger than 18: For entering Canada, if you are not traveling with your parents, it is advisable to carry a letter stating that they have granted you permission to visit.

Take along sufficient funds and plan to exchange currency at a bank, since stores or restaurants often don’t give the full exchange rate. Canadian Customs will allow you to carry a two-day supply of food into Canada duty-free. You may find U.S. Customs less relaxed about the transportation of food across the border. Also, if you are carrying prescription drugs, keep them in the original container from your pharmacist.

For other questions pertaining to crossing the international border, call 406-889-3865 (Port of Roosville, MT); or 604-535-5450 (British Columbia).

In 2018, a spur route was added from Seeley Lake to Adventure Cycling’s hometown of Missoula. At just a hair over 65 miles, this is a very challenging route through a maze of steep terrain on a mix of surfaces including overgrown old logging roads and singletrack trail. The route is devoid of signage much of the way. While riding, proper attention should be paid to the maps. In addition, we heartily recommend using the Missoula Spur digital route data or our mobile app to zoom in and get the finer route details that aren’t immediately apparent at our map scale.

Public Lands and Camping

The route often travels on public land administered by a variety of federal agencies such as USFS, BLM, and COE as well as state lands managers. There are an abundance of established public campgrounds along the route. The amenities of these campgrounds range from reservable sites with RV hookups and showers, to first-come-first-serve sites with fire rings and pit toilets. Campgrounds are open seasonally and open/close dates will vary. Contact Ranger Districts to confirm status, especially in the shoulder season. To make reservations or get more information on individual US Federal campgrounds, call 877-444-6777 or visit www.recreation.gov.

In addition to established campgrounds, it is legal to camp on USFS or BLM land following the guidelines found here: advcy.link/dispersecamp.

The USFS and BLM also maintain and rent a number of cabins. Some of these are winter only rentals. Reservations are required. Many of these cabins are in high demand and booked many months, up to a year, in advance. To get more information and to reserve a cabin, guard station, or lookout tower, visit www.recreation.gov.

Remote Riding Conditions

The Great Divide Mountain Bike Route is a circuitous, madly meandering path, neither the shortest way from point A to point B, nor designed for those in a hurry to “get there.”

Many wild, remote stretches exist along the route that are not elaborated on here. High temperatures, lofty elevations, wild animals, inclement weather (including lightning storms, snowstorms, and extremely strong winds), wildfires, and other potential hazards are plentiful. Understand in advance how to prepare for and cope with them.

Piped water sources tend to be limited, so replenish your supplies whenever the opportunity presents itself. A high-quality water treatment setup should be on your equipment list. Plenty of surface water can be found along the route, but it should be ingested only after running it through a good water filter or using a chemical treatment.

Pack along bug repellent, sunscreen, and a first-aid kit. Carry bicycle tools, a tire pump, and spare tubes. Be prepared for any possibility.

Most of the route is in bear country; both grizzly and black bear north of Pinedale, Wyoming, and black bear only south of there. You should carry bear deterrent spray, available at outdoor gear shops in the larger towns along the route, and become familiar with its safe and proper use. Always be bear-aware, and follow these rules when camping (these will help ward of other unwanted visitors, such as raccoons and, at the very southern reaches of the route, javelina):
• Store all food, garbage, and other attractants in a bear-resistant manner, well away from your tent. This can include hanging them in a stuff sack from rope slung over a high, isolated tree branch, or storing them in a bear-proof container provided at campgrounds.
• Attractants such as food leftovers, fish entrails, and bacon grease should not be buried or burned in campfires. Leftover food and waste should be placed in a sealed bag or container and packed out with garbage. If leftover food or other attractants must be burned, do so in a contained cookstove or in an appropriate container over a campfire, then pack out the ash.

We discourage you from attempting to ride this route solo; in fact, a minimum group size of three is strongly recommended. If a rider is debilitated in the backcountry, you will want to have at least one person to stay with the injured/sick rider, and another to go for help. Most backcountry travelers now carry cell phones in hopes that they will be of use in an emergency situation – but be aware that reception is very spotty along much of the route.

While signs are sometimes referred to in the narratives, don’t count on them actually being present when you arrive at the designated spot. Signage disappears or changes more frequently than we might like. (And please alert us when you encounter missing signs so we can make the appropriate updates to aid future riders.)

Particularly in dry summers, portions of the route can become quite washboarded, making for uncomfortable riding conditions. In other places, the route is very rocky. How to prepare for such rugged conditions is each rider’s choice. Some go with fully suspended bicycles; others with a bike featuring a front shock only. Still others ride unsuspended bikes, counting on specialized frame features (such as the vibration reduction system built into the Salsa Cutthroat bicycle), shock-absorbing seatposts (like the Cane Creek Thudbuster,) and/or soft-riding tires pushing five inches in width (as in fat bikes) to soak up the shock. Some particularly hardy riders simply grin and bear it, with no shock-absorption features or add-ons on their unsuspended mountain or cyclocross bikes. (There are also riders who’ve done the route aboard fixed gear single-speeds; so, yes, there are masochists among us.)

Fifteen or twenty years ago, the outfit of choice for hauling gear on the Great Divide was most commonly a trailer, such as a B.O.B. (Beast of Burden). In the meantime, more and more riders have moved over to panniers or bikepacking setups, which include a creatively designed array of frame bags, handlebar packs, seat bags, and more. (To review a few of the solutions, go to the Cycling Equipment page in the Cyclosource section of adventurecycling.org, then filter by “Bikepacking.”)

Where designated campgrounds exist along the route, they are depicted on the map with a symbol, as are recommended campgrounds lying off the route. Sites in developed Forest Service campgrounds typically cost from $8 to $15. In general on Forest Service and BLM lands it is permissible to camp anywhere unless it is signed to the contrary. So, much of the time you will find yourself camping at informal, “dispersed” sites, which are free.

For many years, we advised riders to tackle the route only in a north-to-south direction, believing that this would provide a better window of opportunity in terms of weather and snow conditions. However, numerous individuals have since successfully ridden the route going from south to north, which is why we have taken the step of providing narratives for both directions of travel. Just be aware of these generalities: high country snow can be a barrier to travel too early in the season, even as far south as northern New Mexico; monsoonal rains (roughly July through September) can make portions of the route, especially in New Mexico, temporarily impassable; and anyone who successfully predicts the weather long-term along the Continental Divide is either lucky or a soothsayer.

And then there’s wildfire, which might be considered the polar opposite of a rainstorm (although they’re often ignited by lightning associated with thunderstorms). Wildfire can and has closed the route, at one time or another, in every state and province visited by the Great Divide. Each year is unique, obviously, so we advise that you regularly check current wildfire status by visiting the website of the National Interagency Fire Center, advcy.link/fireinfo, or by phoning them at 208-387-5050.

Due to the remote nature of this route we have developed a list of shuttle options for cyclists to get to and leave from the route. Some of these options are commercial operations, some are individuals that saw a need over the years and offer their services. The list: advcy.link/GDshuttle.

Keep in mind and follow these simple rules for trail etiquette. See the International Mountain Bike Association (IMBA) Rules of the Trail, advcy.link/IMBArules.

Here it is in a nutshell: In addition to having stout lungs and strong legs, to ride the entire Great Divide within a planned timeframe you’ll need to have on your side a little luck with the weather and other environmental conditions.

Good luck, and have fun; go easy on the land and be good to other backcountry travelers, whether they’re in a four-wheel-drive vehicle or on foot, trailbike, or horseback. Give us a call with your feedback, and don’t get too lost!

Missoula Spur

Rigorous ride through lands recently opened to public recreation after years of logging. Remote and steep, with some technical singletrack riding.

Rimini Alternate

16 miles shorter and avoids Helena. This alternate requires careful planning as services are very limited and road surfaces are rough.

Updated: Jan 31, 2023

TRAIL GUIDE

This section of the Great Divide Mountain Bike Route leads from Helena, Montana, to Colter Bay, Wyoming, by way of historic mining regions, the sprawling ranchlands of southwest Montana, and one of the crown jewels of our National Park System. The route also passes through the Redrock Lakes National Wildlife Refuge and incorporates the short, 72-mile section of the route claimed by Idaho.

The recommended supplemental maps for this section include the visitor maps for these national forests: Helena-Lewis and Clark National Forest (406-449-5201), Beaverhead-Deerlodge National Forest (406-683-3900), and Caribou-Targhee National Forest (208-524-7500). You can purchase them at the individual forest offices or by visiting advcy.link/NFmaps or calling 971-263-3149.

13.2 of Idaho’s 75.9 miles are on a rail-trail conversion following the route of the old Oregon Short Line, which was responsible for delivering turn-of-the century tourists to Yellowstone National Park. The northern portion of this rail-trail is very bumpy and runs through soft volcanic soils that can make riding a challenge, so you might want to consider taking the Fish Creek Alternate route shown on the map. The riding on the southern portion is smoother. Also, note that Mack’s Inn (slightly off route) has the only well-stocked grocery between Butte and Colter Bay Village. The route then enters Wyoming, cutting between Yellowstone and Grand Teton national parks on the relatively little-traveled Reclamation Road, also known as the Ashton-Flagg Road and/or Grassy Lake Road.

In the Northern Rockies, the best time to plan for a mountain bike tour is that sweet spot after the snow has melted up high, but before wildfire season begins in earnest. This typically means sometime between late June and late July. If you’re planning your trip six months in advance, shoot for this window. Concerning the other end of the cycling season, plan to be off the route by late October. Snow can start flying as early as late September.

Regardless of when you strike out or how long you intend to be out, pack along raingear and cold-weather clothing. Snow or cold rain is possible any day of the year at some of the elevations encountered, and hypothermia is an ever-present possibility. Also remain vigilant of the fact that this is bear country, so carefully review the information detailed under “Remote Riding Conditions.”

Public Lands and Camping

The route often travels on public land administered by a variety of federal agencies such as USFS, BLM, and COE as well as state lands managers. There are an abundance of established public campgrounds along the route. The amenities of these campgrounds range from reservable sites with RV hookups and showers, to first-come-first-serve sites with fire rings and pit toilets. Campgrounds are open seasonally and open/close dates will vary. Contact Ranger Districts to confirm status, especially in the shoulder season. To make reservations or get more information on individual US Federal campgrounds, call 877-444-6777 or visit www.recreation.gov.

In addition to established campgrounds, it is legal to camp on USFS or BLM land following the guidelines found here: advcy.link/dispersecamp.

The USFS and BLM also maintain and rent a number of cabins. Some of these are winter only rentals. Reservations are required. Many of these cabins are in high demand and booked many months, up to a year, in advance. To get more information and to reserve a cabin, guard station, or lookout tower, visit www.recreation.gov.

We ask that all riders follow the International Mountain Biking Association’s Rules of the Trail: advcy.link/IMBArules.

Finally, you are advised to purchase and pack along the book Cycling the Great Divide (available through Adventure Cycling Association). The guidebook contains a wealth of information on history, geology, and natural history that will enrich your experience as you go.

Remote Riding Conditions

The Great Divide Mountain Bike Route is a circuitous, madly meandering path, neither the shortest way from point A to point B, nor designed for those in a hurry to “get there.”

Many wild, remote stretches exist along the route that are not elaborated on here. High temperatures, lofty elevations, wild animals, inclement weather (including lightning storms, snowstorms, and extremely strong winds), wildfires, and other potential hazards are plentiful. Understand in advance how to prepare for and cope with them.

Piped water sources tend to be limited, so replenish your supplies whenever the opportunity presents itself. A high-quality water treatment setup should be on your equipment list. Plenty of surface water can be found along much of the route, but it should be ingested only after running it through a good water filter or using a chemical treatment.

Pack along bug repellent, sunscreen, and a first-aid kit. Carry bicycle tools, a tire pump, and spare tubes. Be prepared for any possibility.

Most of the route is in bear country; both grizzly and black bear north of Pinedale, Wyoming, and black bear only south of there. You should carry bear repellent spray, available at outdoor gear shops in the larger towns along the route, and become familiar with its safe and proper use. Always be bear-aware, and follow these rules when camping (these will also help ward of other unwanted visitors, such as raccoons and, at the very southern reaches of the route, javelina):

  • Store all food, garbage, and other attractants in a bear-resistant manner, well away from your tent. This can include hanging them in a stuff sack from rope slung over a high, isolated tree branch, or storing them in a bear-proof container provided at campgrounds.
  • Attractants such as food leftovers, fish entrails, and bacon grease should not be buried or burned in campfires. Leftover food and waste should be placed in a sealed bag or container and packed out with garbage. If leftover food or other attractants must be burned, do so in a contained cookstove or in an appropriate container over a campfire, then pack out the ash.

We discourage you from attempting to ride this route solo; in fact, a minimum group size of three is strongly recommended. If a rider is debilitated in the backcountry, you will want to have at least one person to stay with the injured/sick rider, and another to go for help. Most backcountry travelers now carry cell phones in hopes that they will be of use in an emergency situation – but be aware that reception is very spotty along much of the route.

While signs are sometimes referred to in the narratives, don’t count on them actually being present when you arrive at the designated spot. Signage disappears or changes more frequently than we might like. (And please alert us when you encounter missing signs so we can make the appropriate updates to aid future riders.)

Particularly in dry summers, portions of the route can become quite washboarded, making for uncomfortable riding conditions. In other places, the route is very rocky. How to prepare for such rugged conditions is each rider’s choice. Some go with fully suspended bicycles; others with a bike featuring a front shock only. Still others ride unsuspended bikes, counting on specialized frame features (such as the vibration reduction system built into the Salsa Cutthroat bicycle), shock-absorbing seatposts (like the Cane Creek Thudbuster,) and/or soft-riding tires pushing five inches in width (as in fat bikes) to soak up the shock. Some particularly hardy riders simply grin and bear it, with no shock-absorption features or add-ons on their unsuspended mountain or cyclocross bikes. (There are also riders who’ve done the route aboard fixed gear single-speeds; so, yes, there are masochists among us.)

Fifteen or twenty years ago, the outfit of choice for hauling gear on the Great Divide was most commonly a trailer, such as a B.O.B. (Beast of Burden). In the meantime, more and more riders have moved over to panniers or bikepacking setups, which include a creatively designed array of frame bags, handlebar packs, seat bags, and more. (To review a few of the solutions, go to the Cycling Equipment page in the Cyclosource section of adventurecycling.org, then filter by “Bikepacking.”)

Where designated campgrounds exist along the route, they are depicted on the map with a symbol, as are recommended campgrounds lying off the route. Sites in developed Forest Service campgrounds typically cost from $8 to $15. In general on Forest Service and BLM lands it is permissible to camp anywhere unless it is signed to the contrary. So, much of the time you will find yourself camping at informal, “dispersed” sites, which are free.

For many years, we advised riders to tackle the route only in a north-to-south direction, believing that this would provide a better window of opportunity in terms of weather and snow conditions. However, numerous individuals have since successfully ridden the route going from south to north, which is why we have taken the step of providing narratives for both directions of travel. Just be aware of these generalities: high country snow can be a barrier to travel too early in the season, even as far south as northern New Mexico; monsoonal rains (roughly July through September) can make portions of the route, especially in New Mexico, temporarily impassable; and anyone who successfully predicts the weather long-term along the Continental Divide is either lucky or a soothsayer.

And then there’s wildfire, which might be considered the polar opposite of a rainstorm (although they’re often ignited by lightning associated with thunderstorms). Wildfire can and has closed the route, at one time or another, in every state and province visited by the Great Divide. Each year is unique, obviously, so we advise that you regularly check current wildfire status by visiting the website of the National Interagency Fire Center, advcy.link/fireinfo, or by phoning them at 208-387-5050.

Due to the remote nature of this route we have developed a list of shuttle options for cyclists to get to and leave from the route. Some of these options are commercial operations, some are individuals that saw a need over the years and offer their services. The list may be found here: advcy.link/GDshuttle.

Here it is in a nutshell: In addition to having stout lungs and strong legs, to ride the entire Great Divide within a planned timeframe you’ll need to have on your side a little luck with the weather and other environmental conditions.

Good luck, and have fun; go easy on the land and be good to other backcountry travelers, whether they’re in a four-wheel-drive vehicle or on foot, trailbike, or horseback. Give us a call with your feedback, and don’t get too lost!

Boulder Alternate

7.1 miles longer and follows I-15. This alternate avoids some of the most challenging terrain along the route. There is a climb/descent between Boulder and Jefferson City.

Divide Alternate

2.2 miles shorter and entirely on pavement. This alternate avoids the legendary Fleecer Ridge.

Fish Creek Alternate

6 miles longer, slightly more scenic and, though sandy in areas, it avoids the EXTREMELY soft volcanic soils of the Yellowstone Branch Line Trail. There is no water along the alternate.

Updated: Sep 10, 2021


TRAIL GUIDE

This section of the Great Divide Mountain Bike Route begins in the magnificent Teton country and winds its way up and over a couple of high Continental Divide crossings before skirting the west slope of the Wind River Mountains en route to historic South Pass City. From there, the route drops into the Great Divide Basin on its way to Rawlins.

The recommended supplemental maps for this section include the visitor maps for these national forests and ranger districts: Bridger-Teton National Forest, Buffalo and Jackson Ranger Districts (307-739-5500); Shoshone National Forest, North Half and South Half (307-527-6241); and Bridger-Teton National Forest, Pinedale Ranger District (307-367-4326). You can purchase them at the individual forest offices or by visiting advcy.link/NFmaps. The route also crosses the lands of several BLM districts, so you may want to obtain the BLM 1:100,000 metric topographic maps for Pinedale, Farson, South Pass, Baroil, and Rawlins (307-328-4200).

More so than on any other portion of the route north of New Mexico, finding drinking water can be problematic between Pinedale and Rawlins. Great Divide veterans recommend stocking up in Pinedale (or Rawlins for northbound riders) and carrying at least three to four gallons per person – at a weight of 25 to 33 pounds – for the long, typically two-day ride. (See the narrative for more information on the distances between permanent water sources.)

The terrain changes dramatically over the course of these 365.5 miles between Colter Bay and Rawlins: from lofty mountain meadows, to sagebrush-covered cattle and pronghorn country, to high, dry desert that’s spectacular in its own right. While in some years it would be feasible to ride parts of this route in May, late spring storms over the high desert can be fierce, so it’s not recommended that you do so. Summer can bring exceptionally hot temperatures and strong winds. Regardless of when you strike out or how long you intend to be out, pack along raingear and cold-weather clothing.

Public Lands and Camping

The route often travels on public land administered by a variety of federal agencies such as USFS, BLM, and COE as well as state lands managers. There are an abundance of established public campgrounds along the route. The amenities of these campgrounds range from reservable sites with RV hookups and showers, to first-come-first-serve sites with fire rings and pit toilets. Campgrounds are open seasonally and open/close dates will vary. Contact Ranger Districts to confirm status, especially in the shoulder season. To make reservations or get more information on individual US Federal campgrounds, call 877-444-6777 or visit www.recreation.gov.

In addition to established campgrounds, it is legal to camp on USFS or BLM land following the guidelines found here: advcy.link/dispersecamp.

The USFS and BLM also maintain and rent a number of cabins. Some of these are winter only rentals. Reservations are required. Many of these cabins are in high demand and booked many months, up to a year, in advance. To get more information and to reserve a cabin, guard station, or lookout tower, visit www.recreation.gov.

Remote Riding Conditions

The Great Divide Mountain Bike Route is a circuitous, madly meandering path, neither the shortest way from point A to point B, nor designed for those in a hurry to “get there.”

Many wild, remote stretches exist along the route that are not elaborated on here. High temperatures, lofty elevations, wild animals, inclement weather (including lightning storms, snowstorms, and extremely strong winds), wildfires, and other potential hazards are plentiful. Understand in advance how to prepare for and cope with them.

Piped water sources tend to be limited, so replenish your supplies whenever the opportunity presents itself. A high-quality water treatment setup should be on your equipment list. Plenty of surface water can be found along much of the route, but it should be ingested only after running it through a good water filter or using a chemical treatment.

Pack along bug repellent, sunscreen, and a first-aid kit. Carry bicycle tools, a tire pump, and spare tubes. Be prepared for any possibility.

Most of the route is in bear country; both grizzly and black bear north of Pinedale, Wyoming, and black bear only south of there. You should carry bear deterrent spray, available at outdoor gear shops in the larger towns along the route, and become familiar with its safe and proper use. Always be bear-aware, and follow these rules when camping (these will help ward of other unwanted visitors, such as raccoons and, at the very southern reaches of the route, javelina):

• Store all food, garbage, and other attractants in a bear-resistant manner, well away from your tent. This can include hanging them in a stuff sack from rope slung over a high, isolated tree branch, or storing them in a bear-proof container provided at campgrounds.

• Attractants such as food leftovers, fish entrails, and bacon grease should not be buried or burned in campfires. Leftover food and waste should be placed in a sealed bag or container and packed out with garbage. If leftover food or other attractants must be burned, do so in a contained cookstove or in an appropriate container over a campfire, then pack out the ash.

We discourage you from attempting to ride this route solo; in fact, a minimum group size of three is strongly recommended. If a rider is debilitated in the backcountry, you will want to have at least one person to stay with the injured/sick rider, and another to go for help. Most backcountry travelers now carry cell phones in hopes that they will be of use in an emergency situation – but be aware that reception is very spotty along much of the route.

While signs are sometimes referred to in the narratives, don’t count on them actually being present when you arrive at the designated spot. Signage disappears or changes more frequently than we might like. (And please alert us when you encounter missing signs so we can make the appropriate updates to aid future riders.)

Particularly in dry summers, portions of the route can become quite washboarded, making for uncomfortable riding conditions. In other places, the route is very rocky. How to prepare for such rugged conditions is each rider’s choice. Some go with fully suspended bicycles; others with a bike featuring a front shock only. Still others ride unsuspended bikes, counting on specialized frame features (such as the vibration reduction system built into the Salsa Cutthroat bicycle), shock-absorbing seatposts (like the Cane Creek Thudbuster,) and/or soft-riding tires pushing five inches in width (as in fat bikes) to soak up the shock. Some particularly hardy riders simply grin and bear it, with no shock-absorption features or add-ons on their unsuspended mountain or cyclocross bikes. (There are also riders who’ve done the route aboard fixed gear single-speeds; so, yes, there are masochists among us.)

Fifteen or twenty years ago, the outfit of choice for hauling gear on the Great Divide was most commonly a trailer, such as a B.O.B. (Beast of Burden). In the meantime, more and more riders have moved over to panniers or bikepacking setups, which include a creatively designed array of frame bags, handlebar packs, seat bags, and more. (To review a few of the solutions, go to the Cycling Equipment page in the Cyclosource section of adventurecycling.org, then filter by “Bikepacking.”)

Where designated campgrounds exist along the route, they are depicted on the map with a symbol, as are recommended campgrounds lying off the route. Sites in developed Forest Service campgrounds typically cost from $8 to $15. In general on Forest Service and BLM lands it is permissible to camp anywhere unless it is signed to the contrary. So, much of the time you will be camping at informal, “dispersed” sites, which are free.

For many years, we advised riders to tackle the route only in a north-to-south direction, believing that this would provide a better window of opportunity in terms of weather and snow conditions. However, numerous individuals have since successfully ridden the route going from south to north, which is why we have taken the step of providing narratives for both directions of travel. Just be aware of these generalities: high country snow can be a barrier to travel too early in the season, even as far south as northern New Mexico; monsoonal rains (roughly July through September) can make portions of the route, especially in New Mexico, temporarily impassable; and anyone who successfully predicts the weather long-term along the Continental Divide is either lucky or a soothsayer.

And then there’s wildfire, which might be considered the polar opposite of a rainstorm (although they’re often ignited by lightning associated with thunderstorms). Wildfire can and has closed the route, at one time or another, in every state and province visited by the Great Divide. Each year is unique, obviously, so we advise that you regularly check current wildfire status by visiting the website of the National Interagency Fire Center, advcy.link/fireinfo, or by phoning them at 208-387-5050.

Due to the remote nature of this route we have developed a list of shuttle options for cyclists to get to and leave from the route. Some of these options are commercial operations, some are individuals that saw a need over the years and offer their services. The list may be found here: advcy.link/GDshuttle.

Keep in mind and follow these simple rules for trail etiquette. See the International Mountain Bike Association (IMBA) Rules of the Trail, advcy.link/IMBArules.

Here it is in a nutshell: In addition to having stout lungs and strong legs, to ride the entire Great Divide within a planned timeframe you’ll need to have on your side a little luck with the weather and other environmental conditions.

Good luck, and have fun; go easy on the land and be good to other backcountry travelers, whether they’re in a four-wheel-drive vehicle or on foot, trailbike, or horseback. Give us a call with your feedback, and don’t get too lost!

Jackson Spur

A scenic spur along the base of the Tetons to the town of Jackson.

Wind River Alternate

4.1 miles shorter and includes 7.9 miles of pavement. If you need services in Dubois, use this alternate.

Updated: Apr 4, 2023

TRAIL GUIDE

This section of the Great Divide Mountain Bike Route begins in Rawlins, Wyoming. South of that windy, rough-hewn Wyoming community the high desert rises to meet the even higher Sierra Madre Range, leading the way into Colorado and Steamboat Springs, the first in a string of ski towns visited. After following the paved Blue River trail system through bustling Summit County and the town of Breckenridge, the route crosses the Continental Divide at Boreas Pass and descends into the broad, windswept basin known as South Park. South of the small town of Hartsel it climbs back into the mountains, then drops into the high-valley town of Salida.

The recommended supplemental maps for this section include the visitor maps for these national forests: Medicine Bow-Routt National Forest (970-870-2299), Arapaho and Roosevelt National Forests (970-295-6600), and the Pike and San Isabel National Forests (719-553-1400). You can purchase them at the individual forest offices or by visiting advcy.link/NFmaps or calling 971-263-3149.

June can be a cold month at the higher elevations of Colorado, so we recommend not attempting to ride this section prior to early July. Due to high-country snowpack, some portions are not even passable in a typical year until that time. Regarding the other end of the cycling season, plan to be off the trail by mid-October at the latest. Regardless of when you strike out or how long you intend to be out, pack along raingear and cold-weather clothing. Snow or cold rain is possible any day of the year at some of the elevations encountered, and hypothermia is an ever-present possibility. Also be aware that after October 1, many private and USFS campgrounds close or have no water available. Call ahead to verify the situation if you are cycling after this date.

Public Lands and Camping

The route often travels on public land administered by a variety of federal agencies such as USFS, BLM, and COE as well as state lands managers. There are an abundance of established public campgrounds along the route. The amenities of these campgrounds range from reservable sites with RV hookups and showers, to first-come-first-serve sites with fire rings and pit toilets. Campgrounds are open seasonally and open/close dates will vary. Contact Ranger Districts to confirm status, especially in the shoulder season. To make reservations or get more information on individual US Federal campgrounds, call 877-444-6777 or visit www.recreation.gov.

In addition to established campgrounds, it is legal to camp on USFS or BLM land following the guidelines found here: advcy.link/dispersecamp.

The USFS and BLM also maintain and rent a number of cabins. Some of these are winter only rentals. Reservations are required. Many of these cabins are in high demand and booked many months, up to a year, in advance. To get more information and to reserve a cabin, guard station, or lookout tower, visit www.recreation.gov.

Remote Riding Conditions

The Great Divide Mountain Bike Route is a circuitous, madly meandering path, neither the shortest way from point A to point B, nor designed for those in a hurry to “get there.”

Many wild, remote stretches exist along the route that are not elaborated on here. High temperatures, lofty elevations, wild animals, inclement weather (including lightning storms, snowstorms, and extremely strong winds), wildfires, and other potential hazards are plentiful. Understand in advance how to prepare for and cope with them.

Piped water sources tend to be limited, so replenish your supplies whenever the opportunity presents itself. A high-quality water treatment setup should be on your equipment list. Plenty of surface water can be found along much of the route, but it should be ingested only after running it through a good water filter or using a chemical treatment.

Pack along bug repellent, sunscreen, and a first-aid kit. Carry bicycle tools, a tire pump, and spare tubes. Be prepared for any possibility.

Most of the route is in bear country; both grizzly and black bear north of Pinedale, Wyoming, and black bear only south of there. You should carry bear deterrent spray, available at outdoor gear shops in the larger towns along the route, and become familiar with its safe and proper use. Always be bear-aware, and follow these rules when camping (these will help ward of other unwanted visitors, such as raccoons and, at the very southern reaches of the route, javelina):
• Store all food, garbage, and other attractants in a bear-resistant manner, well away from your tent. This can include hanging them in a stuff sack from rope slung over a high, isolated tree branch, or storing them in a bear-proof container provided at campgrounds.
• Attractants such as food leftovers, fish entrails, and bacon grease should not be buried or burned in campfires. Leftover food and waste should be placed in a sealed bag or container and packed out with garbage. If leftover food or other attractants must be burned, do so in a contained cookstove or in an appropriate container over a campfire, then pack out the ash.

We discourage you from attempting to ride this route solo; in fact, a minimum group size of three is strongly recommended. If a rider is debilitated in the backcountry, you will want to have at least one person to stay with the injured/sick rider, and another to go for help. Most backcountry travelers now carry cell phones in hopes that they will be of use in an emergency situation – but be aware that reception is very spotty along much of the route.

While signs are sometimes referred to in the narratives, don’t count on them actually being present when you arrive at the designated spot. Signage disappears or changes more frequently than we might like. (And please alert us when you encounter missing signs so we can make the appropriate updates to aid future riders.)

Particularly in dry summers, portions of the route can become quite washboarded, making for uncomfortable riding conditions. In other places, the route is very rocky. How to prepare for such rugged conditions is each rider’s choice. Some go with fully suspended bicycles; others with a bike featuring a front shock only. Still others ride unsuspended bikes, counting on specialized frame features (such as the vibration reduction system built into the Salsa Cutthroat bicycle), shock-absorbing seatposts (like the Cane Creek Thudbuster,) and/or soft-riding tires pushing five inches in width (as in fat bikes) to soak up the shock. Some particularly hardy riders simply grin and bear it, with no shock-absorption features or add-ons on their unsuspended mountain or cyclocross bikes. (There are also riders who’ve done the route aboard fixed gear single-speeds; so, yes, there are masochists among us.)

Fifteen or twenty years ago, the outfit of choice for hauling gear on the Great Divide was most commonly a trailer, such as a B.O.B. (Beast of Burden). In the meantime, more and more riders have moved over to panniers or bikepacking setups, which include a creatively designed array of frame bags, handlebar packs, seat bags, and more. (To review a few of the solutions, go to the Cycling Equipment page in the Cyclosource section of adventurecycling.org, then filter by “Bikepacking.”)
Where designated campgrounds exist along the route, they are depicted on the map with a symbol, as are recommended campgrounds lying off the route. Sites in developed Forest Service campgrounds typically cost from $8 to $15. In general on Forest Service and BLM lands it is permissible to camp anywhere unless it is signed to the contrary. So, much of the time you will find yourself camping at informal, “dispersed” sites, which are free.

For many years, we advised riders to tackle the route only in a north-to-south direction, believing that this would provide a better window of opportunity in terms of weather and snow conditions. However, numerous individuals have since successfully ridden the route going from south to north, which is why we have taken the step of providing narratives for both directions of travel. Just be aware of these generalities: high country snow can be a barrier to travel too early in the season, even as far south as northern New Mexico; monsoonal rains (roughly July through September) can make portions of the route, especially in New Mexico, temporarily impassable; and anyone who successfully predicts the weather long-term along the Continental Divide is either lucky or a soothsayer.

And then there’s wildfire, which might be considered the polar opposite of a rainstorm (although they’re often ignited by lightning associated with thunderstorms). Wildfire can and has closed the route, at one time or another, in every state and province visited by the Great Divide. Each year is unique, obviously, so we advise that you regularly check current wildfire status by visiting the website of the National Interagency Fire Center, advcy.link/fireinfo, or by phoning them at 208-387-5050.

Due to the remote nature of this route we have developed a list of shuttle options for cyclists to get to and leave from the route. Some of these options are commercial operations, some are individuals that saw a need over the years and offer their services. The list may be found here: advcy.link/GDshuttle.

Keep in mind and follow these simple rules for trail etiquette. See the International Mountain Bike Association (IMBA) Rules of the Trail, advcy.link/IMBArules.

Here it is in a nutshell: In addition to having stout lungs and strong legs, to ride the entire Great Divide within a planned timeframe you’ll need to have on your side a little luck with the weather and other environmental conditions.

Good luck, and have fun; go easy on the land and be good to other backcountry travelers, whether they’re in a four-wheel-drive vehicle or on foot, trailbike, or horseback. Give us a call with your feedback, and don’t get too lost!

Columbine Alternate

4.1 miles shorter, similar traffic volume on wider, potentially dustier road. Still very beautiful.

Updated: Jan 11, 2023


TRAIL GUIDE

This section of the Great Divide Mountain Bike Route leads from Salida, Colorado, to the Conejos River outpost of Platoro, then onward into New Mexico, the aptly nicknamed “Land of Enchantment.” Here it traverses the remote, high-elevation Tusas Mountains before passing through three New Mexico villages straight out of Old Mexico: Cañon Plaza, Vallecitos, and El Rito. South of Abiquiu, a tough, 25-mile climb up Polvadera Mesa leads into the heavily forested Jemez Mountains, where elk and black bear are common residents. South of the town of Cuba the route winds through the carved maze of eroded terrain that separates Mesa Chivato and Chaco Mesa. From there it traverses the northwest flank of the San Mateo Mountains before dropping into the sprawling community of Grants.

The recommended supplemental maps for this section include the visitor maps for these national forests: Gunnison National Forest (970-874-6600), Rio Grande National Forest (719-852-5941), Carson National Forest (575-758-6200), Santa Fe National Forest (505-438-5300), and Cibola National Forest – Mt. Taylor Ranger District (505-287-8833). You can purchase them at the individual forest offices or by visiting advcy.link/NFmaps. Also recommended is the BLM 1:100,000-scale topographic map of Chaco Mesa (505-438-7542).

June can be a cold month at the high elevations of southern Colorado and northern New Mexico, so we recommend that you not attempt to ride this section prior to early July. The highest portions may not be entirely free of snow until that time, anyway. Regarding the other end of the cycling season, plan to be off the trail by mid-October at the latest. Regardless of when you leave or how long you intend to be out, pack along raingear and cold-weather clothing, because strong winds, cold rain, and even snow are possible throughout the riding season. After October 1, many private and USFS campgrounds close or have no water available. Call ahead to verify the situation if you’ll be cycling after this date.

Between Abiquiu and Cuba, the road surface is very rocky and sandy. Full suspension is recommended. Otherwise, you may want to detour onto SR 96.

Unsurfaced roads – particularly in the Tusas Mountains of New Mexico and those between Cuba and Grants – may be impassable when wet, due to the nature of the soils. In the case of summer thundershowers the roads will typically dry out within a few hours after the rain stops. However, if you arrive during a late-summer period of monsoonal rains, which can keep things muddy for days at a time, you may be forced to follow the Chaco Alternate.

This paved alternate provides access to Chaco Culture National Historical Park via mostly dirt roads that may be impassable in inclement weather. The park has camping, but no other services; water is available at the visitor center (505-786-7014 ext. 221). The campground is situated approximately 33 miles from Pueblo Pintado or 29 miles from White Horse, both of which lie along the alternate route. See the park website for directions and current conditions: www.nps.gov/chcu.

Drinking water is also a concern on the stretch between Cuba and Grants: From Cuba to Ojo Frio Spring the distance is 47 miles, and from Ojo Frio to San Mateo Spring it is another 50 miles. So stock up whenever you can!

Public Lands and Camping

The route often travels on public land administered by a variety of federal agencies such as USFS, BLM, and COE as well as state lands managers. There are an abundance of established public campgrounds along the route. The amenities of these campgrounds range from reservable sites with RV hookups and showers, to first-come-first-serve sites with fire rings and pit toilets. Campgrounds are open seasonally and open/close dates will vary. Contact Ranger Districts to confirm status, especially in the shoulder season. To make reservations or get more information on individual US Federal campgrounds, call 877-444-6777 or visit www.recreation.gov.

In addition to established campgrounds, it is legal to camp on USFS or BLM land following the guidelines found here: advcy.link/dispersecamp.

The USFS and BLM also maintain and rent a number of cabins. Some of these are winter only rentals. Reservations are required. Many of these cabins are in high demand and booked many months, up to a year, in advance. To get more information and to reserve a cabin, guard station, or lookout tower, visit www.recreation.gov.

Remote Riding Conditions

The Great Divide Mountain Bike Route is a circuitous, madly meandering path, neither the shortest way from point A to point B, nor designed for those in a hurry to “get there.”

Many wild, remote stretches exist along the route that are not elaborated on here. High temperatures, lofty elevations, wild animals, inclement weather (including lightning storms, snowstorms, and extremely strong winds), wildfires, and other potential hazards are plentiful. Understand in advance how to prepare for and cope with them.

Piped water sources tend to be limited, so replenish your supplies whenever the opportunity presents itself. A high-quality water treatment setup should be on your equipment list. Plenty of surface water can be found along much of the route, but it should be ingested only after running it through a good water filter or using a chemical treatment.

Pack along bug repellent, sunscreen, and a first-aid kit. Carry bicycle tools, a tire pump, and spare tubes. Be prepared for any possibility.

Most of the route is in bear country; both grizzly and black bear north of Pinedale, Wyoming, and black bear only south of there. You should carry bear deterrent spray, available at outdoor gear shops in the larger towns along the route, and become familiar with its safe and proper use. Always be bear-aware, and follow these rules when camping (these will help ward of other unwanted visitors, such as raccoons and, at the very southern reaches of the route, javelina):

• Store all food, garbage, and other attractants in a bear-resistant manner, well away from your tent. This can include hanging them in a stuff sack from rope slung over a high, isolated tree branch, or storing them in a bear-proof container provided at campgrounds.

• Attractants such as food leftovers, fish entrails, and bacon grease should not be buried or burned in campfires. Leftover food and waste should be placed in a sealed bag or container and packed out with garbage. If leftover food or other attractants must be burned, do so in a contained cookstove or in an appropriate container over a campfire, then pack out the ash.

We discourage you from attempting to ride this route solo; in fact, a minimum group size of three is strongly recommended. If a rider is debilitated in the backcountry, you will want to have at least one person to stay with the injured/sick rider, and another to go for help. Most backcountry travelers now carry cell phones in hopes that they will be of use in an emergency situation – but be aware that reception is very spotty along much of the route.

While signs are sometimes referred to in the narratives, don’t count on them actually being present when you arrive at the designated spot. Signage disappears or changes more frequently than we might like. (And please alert us when you encounter missing signs so we can make the appropriate updates to aid future riders.)

Particularly in dry summers, portions of the route can become quite washboarded, making for uncomfortable riding conditions. In other places, the route is very rocky. How to prepare for such rugged conditions is each rider’s choice. Some go with fully suspended bicycles; others with a bike featuring a front shock only. Still others ride unsuspended bikes, counting on specialized frame features (such as the vibration reduction system built into the Salsa Cutthroat bicycle), shock-absorbing seatposts (like the Cane Creek Thudbuster,) and/or soft-riding tires pushing five inches in width (as in fat bikes) to soak up the shock. Some particularly hardy riders simply grin and bear it, with no shock-absorption features or add-ons on their unsuspended mountain or cyclocross bikes. (There are also riders who’ve done the route aboard fixed gear single-speeds; so, yes, there are masochists among us.)

Fifteen or twenty years ago, the outfit of choice for hauling gear on the Great Divide was most commonly a trailer, such as a B.O.B. (Beast of Burden). In the meantime, more and more riders have moved over to panniers or bikepacking setups, which include a creatively designed array of frame bags, handlebar packs, seat bags, and more. (To review a few of the solutions, go to the Cycling Equipment page in the Cyclosource section of adventurecycling.org/store, then filter by “Bikepacking.”)

Where designated campgrounds exist along the route, they are depicted on the map with a symbol, as are recommended campgrounds lying off the route. Sites in developed Forest Service campgrounds typically cost from $8 to $15. In general on Forest Service and BLM lands it is permissible to camp anywhere unless it is signed to the contrary. So, much of the time you will find yourself camping at informal, “dispersed” sites, which are free.

For many years, we advised riders to tackle the route only in a north-to-south direction, believing that this would provide a better window of opportunity in terms of weather and snow conditions. However, numerous individuals have since successfully ridden the route going from south to north, which is why we have taken the step of providing narratives for both directions of travel. Just be aware of these generalities: high country snow can be a barrier to travel too early in the season, even as far south as northern New Mexico; monsoonal rains (roughly July through September) can make portions of the route, especially in New Mexico, temporarily impassable; and anyone who successfully predicts the weather long-term along the Continental Divide is either lucky or a soothsayer.

And then there’s wildfire, which might be considered the polar opposite of a rainstorm (although they’re often ignited by lightning associated with thunderstorms). Wildfire can and has closed the route, at one time or another, in every state and province visited by the Great Divide. Each year is unique, obviously, so we advise that you regularly check current wildfire status by visiting the website of the National Interagency Fire Center, advcy.link/fireinfo, or by phoning them at 208-387-5050.

Due to the remote nature of this route we have developed a list of shuttle options for cyclists to get to and leave from the route. Some of these options are commercial operations, some are individuals that saw a need over the years and offer their services. The list may be found here: advcy.link/GDshuttle.

Keep in mind and follow these simple rules for trail etiquette. See the International Mountain Bike Association (IMBA) Rules of the Trail, advcy.link/IMBArules.

Here it is in a nutshell: In addition to having stout lungs and strong legs, to ride the entire Great Divide within a planned timeframe you’ll need to have on your side a little luck with the weather and other environmental conditions.

Good luck, and have fun; go easy on the land and be good to other backcountry travelers, whether they’re in a four-wheel-drive vehicle or on foot, trailbike, or horseback. Give us a call with your feedback, and don’t get too lost!

Chaco Alternate

5.8 miles shorter, and paved the entire way. Use this if you’re traveling during the late-summer monsoonal rain season or going to Chaco Culture National Historical Park.

Updated: Jun 6, 2023


TRAIL GUIDE

Once the southbound rider arrives in Grants, most of the route’s high mountain country is in his rear-view mirror (while it’s just barely started for the northbound!). South of the impressive badlands terrain of El Malpais National Monument the route visits Pie Town, famous for its… you guessed it. After skirting the barren Plains of San Agustin, then climbing across the exceptionally rugged mountains of the Gila National Forest – where each steep descent is followed by an equally steep climb – the route pulls into Silver City. Here the mountains end and the desert begins, surrounding you all the way to the door to Old Mexico.

The recommended supplemental map for this section includes that of the Gila National Forest (575-388-8201). You may obtain it by calling that number or by visiting nationalforestmapstore.com or calling 406-329-3024.

Unsurfaced roads – particularly those situated between El Malpais National Monument and the Gila National Forest’s Beaverhead Work Center – may be impassable when wet, due to the nature of the soils. In the case of summer thundershowers the roads will typically dry out within a few hours after the rain stops, so it will simply be a matter of sitting out the storm and its aftermath. However, if you arrive during a late-summer period of monsoonal rains, which can keep things soaking wet for days at a time, you may be forced to follow an alternative paved route.

Drinking water is also a concern on this stretch: South of Grants, the distance from the Bandera Ice Caves, where water is available, to Pie Town is 67 miles. However, the route does occasionally pass windmills which, when operating, feed water into stock tanks. The water is generally potable, but as a precaution it should be filtered. (Be careful not to keep cattle away from the tanks.) Also be aware that streams mentioned on the map may be dry. Your policy should be to pack along the minimum amount of water you think you’ll need for the 47- to 67-mile stretches, and refill if and when you encounter bonus water sources.

The northern parts of this section are generally passable from March through November. The final stretch from Silver City to Antelope Wells is open throughout the year, although late spring and early summer bring extremely high temperatures. Regardless of when you strike out or how long you intend to be out, pack along raingear and cold-weather clothing, because strong winds and cold rain are possible throughout the riding season.

An optional end to your ride may be made via the 47-mile Columbus Alternate from Hachita to the international border just south of Columbus. Regardless of which endpoint you choose, it’s advisable to check in advance with the U.S. Department of State for travel advisories regarding the border at travel.state.gov/.

Public Lands and Camping

The route often travels on public land administered by a variety of federal agencies such as USFS, BLM, and COE as well as state lands managers. There are an abundance of established public campgrounds along the route. The amenities of these campgrounds range from reservable sites with RV hookups and showers, to first-come-first-serve sites with fire rings and pit toilets. Campgrounds are open seasonally and open/close dates will vary. Contact Ranger Districts to confirm status, especially in the shoulder season. To make reservations or get more information on individual US Federal campgrounds, call 877-444-6777 or visit www.recreation.gov.

In addition to established campgrounds, it is legal to camp on USFS or BLM land following the guidelines found here: advcy.link/dispersecamp.

The USFS and BLM also maintain and rent a number of cabins. Some of these are winter only rentals. Reservations are required. Many of these cabins are in high demand and booked many months, up to a year, in advance. To get more information and to reserve a cabin, guard station, or lookout tower, visit www.recreation.gov.

Remote Riding Conditions

The Great Divide Mountain Bike Route is a circuitous, madly meandering path, neither the shortest way from point A to point B, nor designed for those in a hurry to “get there.”

Many wild, remote stretches exist along the route that are not elaborated on here. High temperatures, lofty elevations, wild animals, inclement weather (including lightning storms, snowstorms, and extremely strong winds), wildfires, and other potential hazards are plentiful. Understand in advance how to prepare for and cope with them.

Piped water sources tend to be limited, so replenish your supplies whenever the opportunity presents itself. A high-quality water treatment setup should be on your equipment list. Plenty of surface water can be found along much of the route, but it should be ingested only after running it through a good water filter or using a chemical treatment.

Pack along bug repellent, sunscreen, and a first-aid kit. Carry bicycle tools, a tire pump, and spare tubes. Be prepared for any possibility.

Most of the route is in bear country; both grizzly and black bear north of Pinedale, Wyoming, and black bear only south of there. You should carry bear repellent spray, available at outdoor gear shops in the larger towns along the route, and become familiar with its safe and proper use. Always be bear-aware, and follow these rules when camping (these will help ward of other unwanted visitors, such as raccoons and, at the very southern reaches of the route, javelina):

  • Store all food, garbage, and other attractants in a bear-resistant manner, well away from your tent. This can include hanging them in a stuff sack from rope slung over a high, isolated tree branch, or storing them in a bear-proof container provided at campgrounds.
  • Attractants such as food leftovers, fish entrails, and bacon grease should not be buried or burned in campfires. Leftover food and waste should be placed in a sealed bag or container and packed out with garbage. If leftover food or other attractants must be burned, do so in a contained cookstove or in an appropriate container over a campfire, then pack out the ash.

We discourage you from attempting to ride this route solo; in fact, a minimum group size of three is strongly recommended. If a rider is debilitated in the backcountry, you will want to have at least one person to stay with the injured/sick rider, and another to go for help. Most backcountry travelers now carry cell phones in hopes that they will be of use in an emergency situation – but be aware that reception is very spotty along much of the route.

While signs are sometimes referred to in the narratives, don’t count on them actually being present when you arrive at the designated spot. Signage disappears or changes more frequently than we might like. (And please alert us when you encounter missing signs so we can make the appropriate updates to aid future riders.)

Particularly in dry summers, portions of the route can become quite washboarded, making for uncomfortable riding conditions. In other places, the route is very rocky. How to prepare for such rugged conditions is each rider’s choice. Some go with fully suspended bicycles; others with a bike featuring a front shock only. Still others ride unsuspended bikes, counting on specialized frame features (such as the vibration reduction system built into the Salsa Cutthroat bicycle), shock-absorbing seatposts (like the Cane Creek Thudbuster,) and/or soft-riding tires pushing five inches in width (as in fat bikes) to soak up the shock. Some particularly hardy riders simply grin and bear it, with no shock-absorption features or add-ons on their unsuspended mountain or cyclocross bikes. (There are also riders who’ve done the route aboard fixed gear single-speeds; so, yes, there are masochists among us.)

Fifteen or twenty years ago, the outfit of choice for hauling gear on the Great Divide was most commonly a trailer, such as a B.O.B. (Beast of Burden). In the meantime, more and more riders have moved over to panniers or bikepacking setups, which include a creatively designed array of frame bags, handlebar packs, seat bags, and more. (To review a few of the solutions, go to the Cycling Equipment page in the Cyclosource section of adventurecycling.org, then filter by “Bikepacking.”)

Where designated campgrounds exist along the route, they are depicted on the map with a symbol, as are recommended campgrounds lying off the route. Sites in developed Forest Service campgrounds typically cost from $8 to $15. In general on Forest Service and BLM lands it is permissible to camp anywhere unless it is signed to the contrary. So, much of the time you will find yourself camping at informal, “dispersed” sites, which are free.

For many years, we advised riders to tackle the route only in a north-to-south direction, believing that this would provide a better window of opportunity in terms of weather and snow conditions. However, numerous individuals have since successfully ridden the route going from south to north, which is why we have taken the step of providing narratives for both directions of travel. Just be aware of these generalities: high country snow can be a barrier to travel too early in the season, even as far south as northern New Mexico; monsoonal rains (roughly July through September) can make portions of the route, especially in New Mexico, temporarily impassable; and anyone who successfully predicts the weather long-term along the Continental Divide is either lucky or a soothsayer.

And then there’s wildfire, which might be considered the polar opposite of a rainstorm (although they’re often ignited by lightning associated with thunderstorms). Wildfire can and has closed the route, at one time or another, in every state and province visited by the Great Divide. Each year is unique, obviously, so we advise that you regularly check current wildfire status by visiting the website of the National Interagency Fire Center, advcy.link/fireinfo, or by phoning them at 208-387-5050.

Due to the remote nature of this route we have developed a list of shuttle options for cyclists to get to and leave from the route. Some of these options are commercial operations, some are individuals that saw a need over the years and offer their services. The list may be found here: advcy.link/GDshuttle.

Here it is in a nutshell: In addition to having stout lungs and strong legs, to ride the entire Great Divide within a planned timeframe you’ll need to have on your side a little luck with the weather and other environmental conditions.

Good luck, and have fun; go easy on the land and be good to other backcountry travelers, whether they’re in a four-wheel-drive vehicle or on foot, trailbike, or horseback. Give us a call with your feedback, and don’t get too lost!

CDT Alternate

6.7 miles shorter than the main route; this alternate use 6 miles of the narrow and challenging Continental Divide Trail. Good technical riding skills are necessary here.

Columbus Alternate

An optional route to the border that includes the all-service town of Columbus and Pancho Villa State Park.

Updated: Sep 10, 2021

Updates to Recently Released Maps

If you are planning a bike tour, be sure to get the most recent map updates and corrections for your route by selecting the route, and the appropriate section(s), from the drop-down menu below.

Over time maps become less useful because things change. Every year Adventure Cycling’s Routes and Mapping Department create map updates and corrections for every map in the Adventure Cycling Route Network, which now totals 52,047 miles. With the help of touring cyclists like you, we receive updates on routing, services, camping, and contact information. Until we can reprint the map with the new information, we verify the suggested changes and publish corrections and updates here on our website.

PLEASE NOTE: Covid has been particularly hard on the small businesses along our routes. While we do our best to keep the maps and these online updates current, you may encounter more closed businesses and longer stretches with limited or no services.

Refer to these updates for the most current information we have and submit reports of changes to the Route Feedback Form for the cyclists coming after you.

NOTE: Map updates and corrections only pertain to long term changes and updates. For short term road closures, please see the Adventure Cycling’s Routes Temporary Road Closures discussion in our Forums.