This or That: Tackling Common Bikepacking Gear Decisions
The Breakdown
The best bikepacking gear setup depends on three factors: your bike size, trip style, and personal preferences. There’s no single “right” answer for every cyclist, but navigating these key choices will help you find yours.
- Seat bag vs. rear rack: Choose a rear rack for small bikes, longer trips, or bulky items. Pick a seat bag for minimalist, lightweight setups.
- Integrated vs. modular bags: Modular (removable) bags suit trips with lodging, frequent bad weather, or where theft is a problem. Integrated bags work best for remote backcountry camping.
- Fork bags: Quick-release systems offer convenience; traditional cages with straps offer versatility.
- Frame bag: Full frame bags can maximize cargo space of small front triangles. Large front triangles can fit a partial frame bag and water bottles for more versatility.
- Water strategy: Bottles handle cooking and electrolytes; bladders enable bigger miles; backpacks provide extra capacity at the expense of comfort.
- Handlebar mount: Rigid cradles can eliminate sag; soft harnesses can save weight.
Building a great bikepacking gear setup is both easier and more confusing than ever.
What was once a simple stylistic choice – touring style or bikepacking style – has splintered into dozens of technical decisions about the ideal ways to carry our cargo and how to pack it: straps or clips, full or partial, integrated or modular, soft or stabilized, and more.
Experienced riders learn what works by accumulating miles, and with those miles, their lists of gear-related preferences and annoyances. But new riders? They often have to predict future problems based on product marketing. Sway? Sounds bad. Sag? Definitely want to avoid that. Every product promises something that sounds important, so how do you know what’s really worth your money?
My own bike travel setups progressed from cheap and funky to (somewhat) more dialed as I’ve experimented over the years. As creator of Exploring Wild and Bikepack Baggregator, I’ve tested a wide range of gear, and heard from many other bikepackers about what works for them and what doesn’t.
When new riders ask me for gear advice, it’s tempting to say “it depends”: on your bike and budget, the type of route that excites you, and your personal aesthetics. But that can be a frustratingly unhelpful answer, so I’ve done my best to distill the major bikepacking gear decisions into clear rules of thumb. Read these as starting points rather than strict decrees, and factor in your own preferences, too. Loving your setup is just as important as anything else.
Looking for new gear? An Adventure Cyclist membership comes with dozens of pro-deals.
![]()
Seat Bag or Rear Rack
The iconic bikepacking seat bag, a vaguely cylindrical soft bag that straps to the seatpost and saddle rails, started as a lightweight and MTB-friendly alternative to a rear rack. After two decades of innovation, many modern racks have narrowed the gap with minimalist, rugged, and universally mountable designs. The choice now comes down to space: how much you need for gear and how much is available between your seat and rear tire.
A seat bag typically holds between six and twelve liters, a relatively small volume that’s easy to fill with extras like cold weather gear or a few days of food. A rear rack, even a minimalist one loaded with mini panniers or fork bags, easily carries 20-plus liters, adding significant cargo capacity. Racks also allow more intuitive organization: You can pack things based on function (e.g. kitchen on the left, closet on the right) instead of stuffing for structural integrity. The main downsides are weight and some awkwardness with hike-a-bike sections.
Then there’s this unfair reality: Seat bags work better for tall people. As a shorter person, I know all too well the sound of my tire rubbing a hole in my seat bag. Small 29er or 700c (or as of 2026, 32er) frames have limited clearance to start with, ruling out most large seat bags. A dropper seatpost cuts maximum capacity by roughly half, even on medium frames. Add rear suspension and even the tallest riders on the largest frames find that a seat bag only gets them so far.
As a rule of thumb, lean toward a rear rack if you:
- Ride a small bike with 29-inch or 700c wheels
- Use a dropper post, rear suspension, or both, especially on small bikes
- Need more gear for longer or more complex trips
- Have bulky items that don’t fit cleanly elsewhere
- Are considering a large (12-plus-liter) seat bag, since these are often unwieldy and hard to pack
Go with a seat bag in the 6- to 12-liter range if you:
- Carry a minimalist gear list
- Prioritize saving weight
- Plan on rugged rides with lots of singletrack and hike-a-bike
- Take short, simple trips in mostly fair weather
- Have comfortable clearance above your rear tire
![]()
Integrated or Modular Bags
Most bikepacking bags break down into two broad styles that I’ll call, for purposes of making my point, easy-to-remove (modular) and hard-to-remove (integrated).
Modular bags slip out of cradles or holsters and come into your tent or room at night — think handlebar harness with removable dry bag, holster-style seat bag, and clip-on or holster panniers. Integrated bags strap or clamp directly to your bike and stay there unless you take time to unmount them, often a fiddly process.
Integrated bags work best for fair weather backcountry trips where your bike spends every night beside your tent at a remote campsite. They’re often simpler, lighter, and less expensive. But they become a daily hassle when your trip regularly requires unloading bags from your bike.
Most bikepacking setups use a mix of both styles, so it’s about choosing your spot on the spectrum. Prioritize removable capacity for your sleeping bag, warm layers, and valuables — a modular handlebar cradle (or harness) plus fork bags go a long way here. Then consider easy removal for the back of your bike, like a holster-style seat bag or quick-release panniers, if your trips regularly involve any of these challenges:
- Rainy weather (packing in the tent keeps gear dry)
- Lodging away from your bike (tiny rooms, walkups with narrow stairwells, or hotels with picky proprietors)
- River crossings, fence hops, or gnarly hike-a-bikes where removing gear helps lighten the load
- Camping near civilization or anywhere theft is a concern
![]()
Quick-Release Fork Bags or Cages and Straps
Quick-release (QR) fork bag systems are a convenience-focused evolution of the traditional dry bag strapped into a cargo cage. A QR system has two parts: a mount bolted to your fork (or rack), and a bag with corresponding hardware that detaches easily with a twisting or clipping motion. No strap fiddling at camp, no cinching on the road. With so many QR systems hitting the market lately, it’s fair to wonder if traditional cargo cages and straps are on their way out.
Versatility is the main tradeoff. Most cargo cage and strap systems can be loaded with any vaguely cylindrical object, from a stuffed dry bag to a water bottle to an inflatable sleeping pad, or even a small solo tent. That makes it easy to mix and match your packing setup for different trips or even different legs of the same trip. For example, you might move a fork bag to somewhere less ideal so you can strap a disposable water bottle into the cage for a long dry stretch ahead, or even finagle a double-loaded cage in a pinch.
QR fork bag systems function more like mini panniers with fixed capacity. They’re great for stuffing with smaller items, but not ideal when mostly empty (e.g. dwindling food stores) since the contents will bounce around. Larger items either fit or don’t – you can’t overload a QR bag like you can a cargo cage. To be fair, some gear makers are trying to solve the versatility tradeoff: Old Man Mountain’s FLiP cage is currently the only system that functions as both a QR mount and a standalone cage.
As a rule of thumb, consider quick-release fork bags if:
- Your setup stays fairly consistent across trips
- You’re gearing up mainly for a single well-defined route
- Your rides don’t typically involve 3-plus day food carries or 6-plus liter water carries
Stick with traditional cages and dry bags if:
- You ride a range of route styles and fine-tune your setup for each trip
- You’re gearing up for a long varied trip with unpredictable food and water needs
![]()
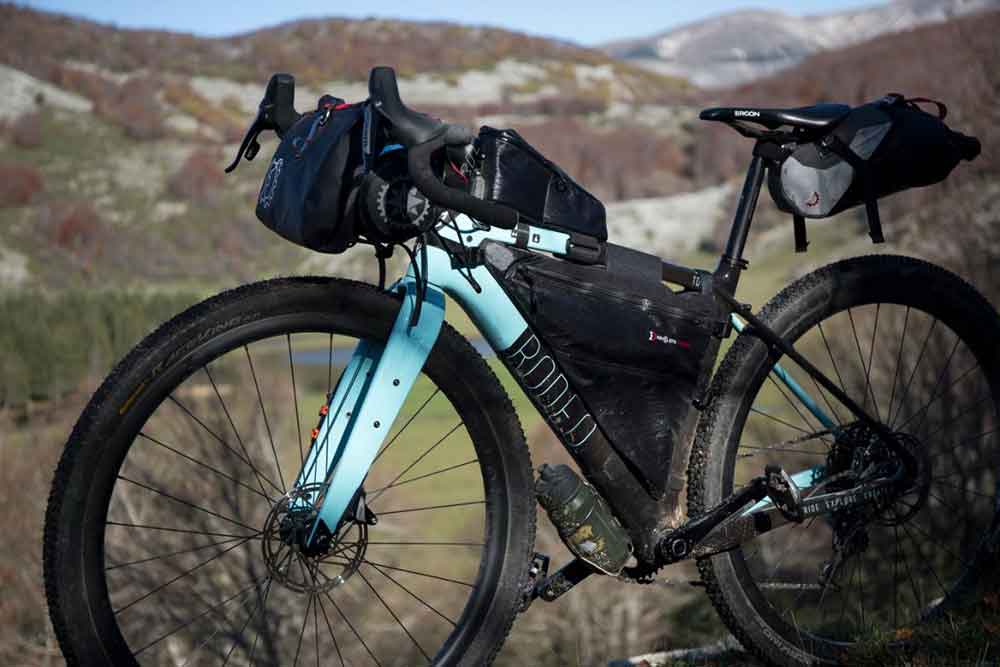
Full Frame Bag or Partial Frame Bag
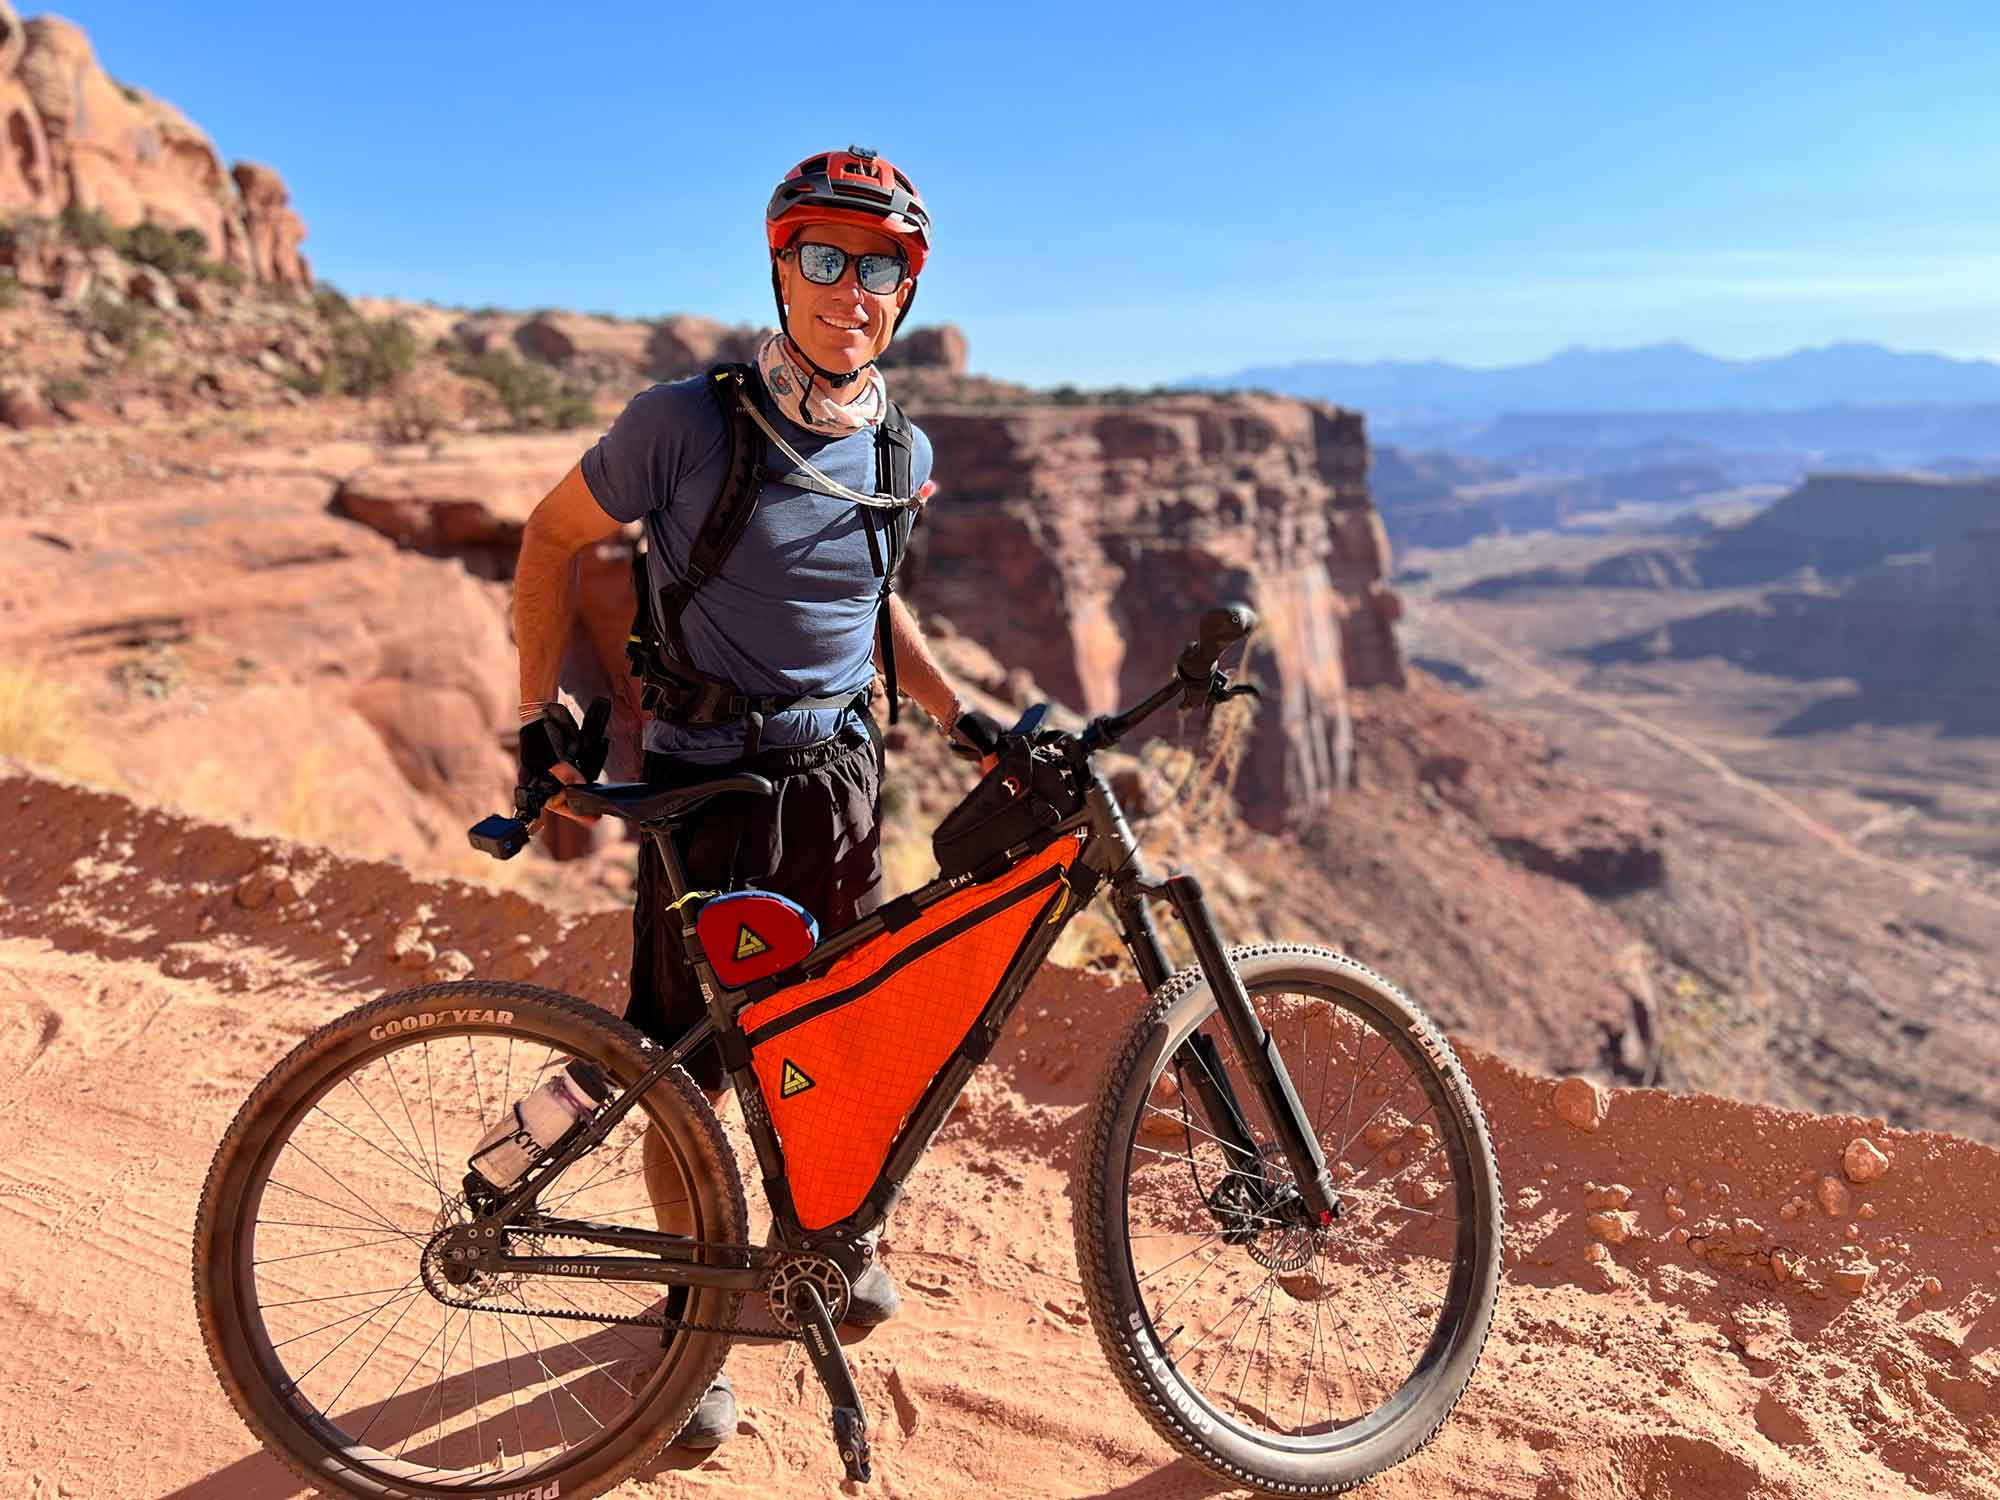
A bike’s front triangle is precious real estate — low and centered, perfect for heavy loads with minimal impact on handling — and frame bags make the most of it.
Full frame bags fill the space most efficiently, hauling heavy things like food, tools, and electronics in the previously wasted gaps between bottles. Folks with hiking experience may find it natural to drop a 2- to 3-liter hydration bladder into a full frame bag as if it were a backpack. The biggest downside to full frame bags is often cost, since a perfect fit usually requires a custom-sewn bag.
Partial frame bags sit below the top tube or wedged into the front corner, leaving room for bottles on larger frames while still adding meaningful space for tools, food, and other heavy items. An affordable, off-the-shelf partial bag can fit your bike well enough since only two sides of the triangle need to match. Last but not least, a partial bag just feels faster than a full one if you’re leaving it on for day rides.
As a rule of thumb, lean toward a full frame bag if your bike’s triangle only has enough space and mounts for two bottle cages. These triangles are small enough to benefit from the space efficiency of a full frame bag while still large enough to offer a meaningful amount of capacity. For example:
- Small or extra-small gravel, road, or touring frames
- Medium or large mountain bike frames with steeply sloping top tubes, which limit frame triangle space
Consider a partial frame bag if your bike’s triangle is big enough for three bottles. Many large and extra large road, gravel, and touring frames can fit a half- or wedge-style frame bag plus a bottle or two. Alternatively you could choose a cavernous full frame bag with an internal divider. You’ll be set either way, and the rest of us are jealous.
Consider skipping a frame bag entirely if your bike lacks space for even a single full-size bottle, such as an extra-small hardtail or full-suspension mountain bike. Custom bags can fit these bikes beautifully, but the storage gained per dollar spent is low.
![]()
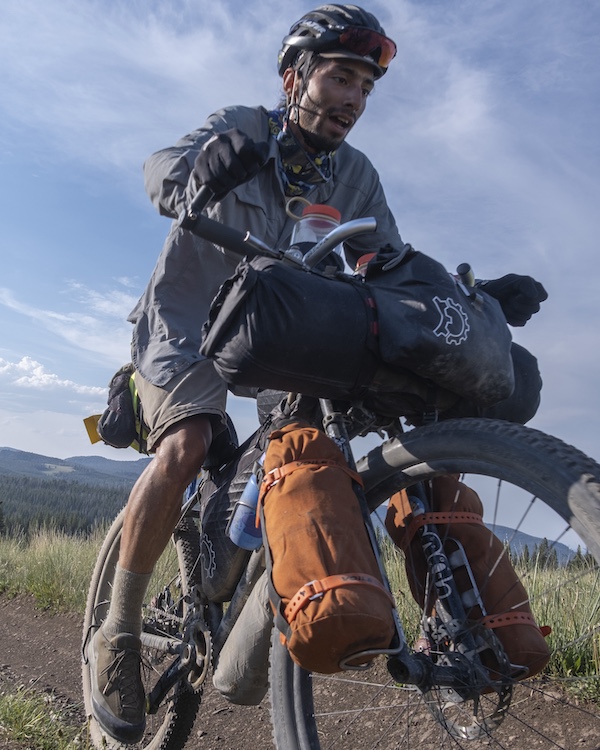
Hydration Pack, Bladder, or Bottles
Frame bags go hand in hand with water strategy: bottles, bladder, or backpack. On water-rich routes this is straightforward, but dry routes can require 6-plus liters of capacity and water carrying creativity.
Bottles are a cyclists’ default, and they’re practical for bikepackers, too. We often complement the standard squeeze bottles — handy for drinking on the go — with bigger Nalgene-style bottles in cargo cages. Bottles are great for mixing electrolyte powders, and handy for cooking and washing at camp. A squirt bottle close at hand has even been known to fend off chasing dogs, the nemesis of rural bike travelers worldwide.
Hydration bladders have roots in hiking and distance running, but some bikepackers embrace them, too. A 2- or 3-liter bladder in a full frame bag can haul a significant chunk of your water needs. They’re easy to drink from while riding (run the hose to a clamp on your handlebars) and require fewer breaks to refill, so they’re excellent for putting down big miles. They can also interface with backcountry water filters, like the Sawyer Squeeze, for hands-free gravity filtering.
Then there are backpacks with hydration bladders, which generally get a bad rap. They can tire shoulder muscles, aggravate saddle sores, and trap sweat. But a well-fitted pack isn’t so bad for a few days, and riders on space-constrained mountain bikes may have few other options. Another benefit many don’t consider: Moving water weight off the bike eases rough hike-a-bike sections, especially for smaller riders lugging a significant portion of their bodyweight up steep trails.
As a rule of thumb, consider a hydration bladder in your frame bag if you:
- Need more water capacity than bottles can easily provide
- Have space in your frame bag for at least a liter bladder
- Like to keep moving rather than stopping to swap bottles, or can’t reach bottles on your bike while riding
Add one or more bottles to your setup if you:
- Use electrolyte or energy drink powders
- Will be cooking or washing at camp
- Ride in areas with loose dogs
Consider a hydration backpack if you:
- Can’t fit all the water you need on your bike
- Ride singletrack-heavy terrain or routes with plenty of hike-a-bike
- Enjoy traveling efficiently and drinking on the move
- Are mainly riding shorter trips, say 2 to 5 days
![]()
Rigid Handlebar Cradle or Soft Harness
There are two ways to attach a dry bag to your bars: a fabric support panel with straps and foam spacers (often called a harness), or a plastic or metal structure with rigid bar clamps (cradle).
Harnesses are generally less expensive, lighter, and more resilient. If you’re on a long-haul trip with flights or bus transport mixed in, they’re also a bit more packable — easier to stuff into a checked bag or squeeze into the luggage compartment of a bus. They can be stable on rough ground when mounted well and packed carefully, but they do have a learning curve. A poorly designed product or lazy packing job can lead to constant strap cinching at best and tire rub or frame abrasions at worst.
Rigid bar clamps eliminate the sag and cinch cycle. They’re great for avoiding tire rub on small 29ers, especially with suspension forks, because you can angle them slightly out and up. Rough terrain shows off their benefits most clearly, but it also exacerbates the weaknesses of rigid cradles: They can break (though this is rare) and they’re usually heavier.
Lean toward a rigid handlebar cradle if you:
- Ride an XS, small, or maybe medium 29er with a suspension fork
- Have a low tolerance for prep like taping your frame or perfecting strap adjustment
- Need more bar space for electronics and stem bags (rigid clamps are usually narrower than straps)
Lean toward a soft-mount handlebar harness if:
- You’re all about packing light and moving fast
- You’re eying long-term bike travel in remote places
![]()
When Choices Change
All those well-meaning rules of thumb notwithstanding, it’s hard to assemble your perfect setup without some miles under your wheels. It takes experience to know what gear works best for your riding preferences, and often experience changes those preferences, making the ideal setup a moving target. You wouldn’t be the first person to start out in love with road touring and wind up obsessed with backcountry singletrack, or vice versa.
Here are some ideas to keep spending manageable while gearing up for your first or next dream route.
Rent or borrow for your first ride or two, if you can. Your loaner gear probably won’t be your final choice, but getting a couple rides under your wheels will help you understand what type of bikepacking you like best and what gear might make it easier. Maybe you can borrow from a friend, find a gear library in your community, or join a group ride that offers loaner gear.
Buy used. Good quality pre-loved gear can be found for great prices on eBay, Facebook Marketplace and specialized buy/sell groups, Craigslist if you’re lucky, cycling-specific forums like PinkBike, members-only marketplaces like REI’s Re/supply, and used gear co-ops in outdoorsy towns.
Sell used. I know how tempting it is to hang on to gear “just in case,” and it’s true that I’ve circled back to older gear a number of times. But if something truly doesn’t work for you, set it free to adventure with someone else and make a few bucks in the process.
If you’re into bike travel for the long haul, gear upgrades and setup tweaks are inevitable. Every bikepacking setup is a unique reflection of its rider, their past experience, and their pedal-powered dreams for the future. I hope these guidelines help you choose great gear, and wherever that gear takes you, I hope you enjoy the ride.