Pocket Guide to Photography
Light
Our best advice is to use natural light to your advantage: shoot early around sunrise and shoot late around sunset. Full noon sun might feel great on your cheeks, but it creates harsh overhead shadows that make getting nice shots tricky, especially when faces are involved. Clouds diffuse sunlight and cast softer shadows, which can make for objectively nicer photos. Of course, you won’t always have control over when the shots you want to capture occur.

Golden hour refers to the first and last hours of sun. At golden hour, the sun shines through a thicker layer of atmosphere, which diffuses the light and scatters blue and violet wavelengths, creating a warmer golden hue. More importantly, the direction of the light source (a.k.a. the sun) is very low during golden hour. It’s easy to make things look great in photos during these times because they actually look great in person.
Blue hour, also called twilight, refers to the hour before sunrise and after sunset. During blue hour, the light’s blue wavelengths dominate, and the light is indirect. Blue hour can make for some nice shots, but the quantity of light will be low, so you’ll need to adjust ISO, shutter speed, and aperture to compensate. Use the chart on the back page as a reference.
Exposure
Exposure is the amount of light that reaches your camera’s sensor, creating visual data over a period of time. That period is most often a fraction of a second determined by shutter speed. Aperture determines how much light is let in during that time.
Most digital cameras feature a live histogram view that can be helpful in determining exposure. A histogram is a graph that displays the tonal values of an image: blacks, shadows, midtones, highlights, and whites.
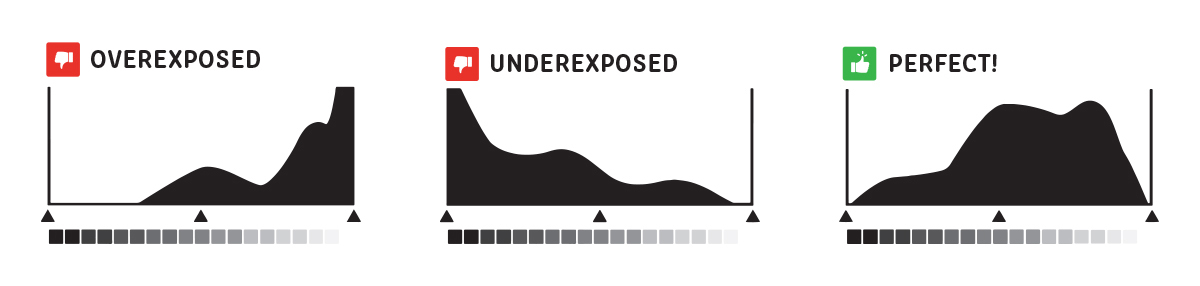
Image detail from blown-out highlights (too far right) and clipped shadows (too far left) is often unrecoverable, even when shooting RAW, so it’s best to avoid this if possible. When faced with an over- or underexposed image, try adjusting your camera’s exposure compensation settings (usually a dial ranging from -3 to +3) to pull the histogram to the center.
When in doubt, most cameras have an automatic bracketing function that will take three or more photos at different exposures and allows you to choose the one that works best for the scene you’re shooting.
Shutter Speed
Shutter speed matters most when shooting handheld in low light, when capturing moving subjects, or when the camera is moving (as in, while you’re riding a bike!).

To freeze fast-moving subjects, use a shutter speed of at least 1/500th of a second (often represented by 500 on a manual dial). To add the feeling of movement to an image, try setting a slower shutter speed (less than 1/30th of a second), and pan the camera to follow the subject as you release the shutter. This keeps the subject in focus while adding motion blur to the background. “B” on your dial stands for “bulb” and will keep the shutter open (long exposure) as long as the shutter release button is held down.
To maintain pin-sharp clarity in handheld photos in low light, keep your shutter speed above 1 over the focal length of the lens you’re using (e.g., 1/50 with a 50mm lens). This is a good place to start, but acceptable minimum shutter speed can vary considerably based on whether your camera or lens has built-in image stabilization, and how many cups of coffee you’ve had that day. Experiment and find what works best for you!
Lenses
In short, lens focal length determines how much of a scene is captured by the camera lens. Wide-angle lenses (shorter focal lengths) capture more of a scene and telephoto lenses (longer focal lengths) see distant objects up close.
Prime lenses are fixed, without zoom — zoom lenses allow you to use a range of focal lengths. Prime lenses typically offer better image quality, are usually smaller and lighter than zooms, and are often cheaper. The biggest selling point for prime lenses is that they are typically faster than zooms, meaning they have a wider maximum aperture that allows for better low-light performance and more pleasing subject/background separation (a.k.a. bokeh).
The downside to shooting with primes is that they’re less versatile than zooms because you’re stuck with one focal length and are reliant on “zooming with your feet.”
Here’s how we think about it:
<24mm: big, epic landscapes and astrophotography
24–28mm: all-purpose wide angle that allows you to capture more of a scene
35–50mm: general, documentary style (most representative of what the human eye sees)
70mm–85mm: portraits or cropping in on details in a landscape
>85mm: wildlife, sports, and other far-off objects
Composition
The most ubiquitous photographic guideline is the Rule of Thirds: divide your image into thirds both horizontally and vertically and align your subject (or the subject’s face if human) in one of the four intersections to balance the elements in the frame and manage negative space. Align the horizon to one of the horizontal lines. Most digital cameras have the option to overlay this grid in the viewfinder. This is a great guideline, but don’t feel confined by it.

Aperture refers to the opening of a lens’s diaphragm through which light passes and is rated in f-stops. See the back page for a visual aid. The aperture affects depth of field, or the zone of sharpness in front of/behind the point of focus.

Balancing foreground, middleground, and background is important. If you’re shooting with shallow depth of field while focused on the middleground, things in the foreground and background will be a bit soft and out of focus, while your subject will shine in the middleground. This can add depth to your photos that enhances the overall composition.
Additionally, use of leading and diagonal lines (painted lines on a road, or edges of the landscape, for example) will draw the viewer’s attention toward the focal point of your composition.
Storytelling
Your adventure is so much more than the pretty landscape you travel through. There are thousands of the exact same photo of the road leading to the Grand Tetons or a loaded bike leaning against a state sign — how will you make yours unique?

Think about your photos as a series telling a story: variety is everything. Take photos of the “downtime moments” of camping/hotel rooms/rest stops. Give viewers a sense of scale by including yourself or your riding partners in a wide landscape shot, especially if big vistas are involved. Conversely, try moving your camera really close to things to get some interesting detail shots.
A big part of visual storytelling is implication and creativity. If you take photos of your bike leaning against something inanimate, try a shallow depth of field to create visual interest — experiment shooting between or right behind stalks of wild grass or flowers to increase that depth. You don’t necessarily need to show the whole bicycle to communicate that a bicycle is present. Instead, you could imply its presence by taking the shot through the frame with a shallow depth of field, literally framing your photo with the bike frame. Play around and maybe even get a little weird with it!
File Format
A RAW file is the equivalent of a film negative (literally raw — it’s not an acronym.) A JPEG file is like having a print.
In your camera settings under Image Quality, you can choose RAW or JPEG. Under the JPEG setting, your camera optimizes images visually, meaning it automatically adjusts contrast, exposure, and vibrancy. JPEGs are smaller than RAW files because they’re compressed, and superfluous information is erased. Shooting in JPEG mode is the most straightforward and can produce great results without the need to do much editing in post production.
RAW photos are exactly what the camera sees, completely uncompressed — unedited, these photos appear muddy, so time spent editing in post-production is required. RAW file sizes are large because they contain the maximum amount of information possible. If you’re an experienced photo editor and have lots of storage space on your hard drive/memory cards, it’s ideal to shoot RAW. Over- and underexposed images are easier to fix, and you can make the image look just how you want.
Hold onto your RAW files to come back to if you ever need to tweak edits but export them as high-resolution JPEGs when you submit your final edits to publications.
Resources
Bicycle Touring Photography: A Quick Guide to Taking Better Photos by Paul Jeurrison
From Selfie to Self Portrait edited by Alex Strickland (Adventure Cyclist, May 2017)
How to Photograph Your Tour edited by Aaron Teasdale
Bonus “Pro” Tips:
Start collecting silica packets. When you head into the backcountry, throw them into your camera bag. The silica gel will absorb any accidental moisture that interacts with your camera.
Consider buying a few inexpensive UV filters to protect your lenses from dirt, dust, and scratches. It’s much less of a headache to replace a UV filter than it is a $500 lens.
Turn any bag into a dedicated photo bag with a camera insert. Camera inserts are available in a wide range of sizes, so it’s useful to know the dimensions of the bag you’re adapting before buying one.
For cycling, light is right and small is … also good. Generally, full-frame cameras and lenses are bigger and heavier than their smaller-sensor counterparts. Modern APS-C and Micro Four Thirds cameras offer a good balance between image quality and portability, and work great for most people. If image quality is of utmost importance, consider a full-frame mirrorless camera paired with a smaller prime lens and leave the pro zoom lens at home.
Print out the guide below, fold it up using our instructions, and carry it with you on your next adventure!