Picking the Right Bike for Bikepacking
The Breakdown
There is no single “right” bikepacking bike — the best setup depends on your terrain, riding style, and budget. This guide breaks down the key bike types: full-suspension mountain bikes (burly but complex), hardtails (versatile and popular), rigid mountain bikes (ideal for many bikepacking routes), drop-bar mountain bikes (great for gravel with occasional singletrack), gravel bikes (fast on maintained unpaved roads), and eBikes (increasingly practical). Beyond bike type, learn what to look for in frame materials (steel, aluminum, carbon, titanium), wheel size, tire width, brakes, gearing, and saddle fit. The key insight? The bike already in your garage is often the best choice for your first trip. In the scrappy, self-reliant world of bikepacking, running what you brung is something to be proud of.
Updated July 2026
An inspiring route is a key ingredient of any bikepacking trip, but the real fun can’t start until you’ve sorted out the “bike” and “packing” parts.
With so many possible combinations of rider, terrain, and bike, there is no one right bikepacking setup. Part of the fun is in getting creative, solving the puzzle, and personalizing your bike and gear to suit your own riding style and budget.
Types of Bikes for Bikepacking
While you can ride any terrain on nearly any bike, matching the bike to its favorite type of terrain will inspire confidence, ease long days in the saddle, and increase the fun factor.
Mountain bikes are full of features to make trail riding more comfortable and fun: big knobby tires for traction, wide handlebars for control and stability, and often a suspension system to take the bite out of bumps.
Full suspension mountain bikes: The burliest of bikes designed for the most rugged of trails, these have a suspension in both front and rear to absorb the impact of aggressive trail riding. The downsides for bikepacking are significant: they’re heavier, more complex, more expensive, and more limited in cargo space. You’ll mostly see full-suspension bikepacking rigs on singletrack-heavy routes like the Colorado Trail.
Hardtail / front suspension mountain bikes: Common, versatile, and suited to a wide range of budgets, hardtails have a suspension fork in front to absorb bumps. A rigid rear maximizes cargo space and keeps the bike lighter, simpler, and more versatile than a rear suspension. They work well on a variety of bikepacking routes, but they’re less efficient than fully rigid bikes on smooth ground. Their sweet spot is moderate singletrack and chunky jeep roads.
Rigid mountain bikes: Rigid mountain bikes have flat bars and frame geometry resembling hardtails but without the front suspension. They usually rely on plus-size tires, usually 2.8” or wider, to absorb bumps and provide traction. Since they’re often designed with bikepacking in mind, they encourage a comfortable riding posture and come with plenty of mounts for racks and gear. They’re ideal for many types of bikepacking, especially moderate dirt and gravel roads, routes with a broad range of terrain, or long overseas tours where a low-maintenance ride is important.
Drop bar mountain bikes: This growing category, exemplified by the classic Salsa Fargo, connects the dots between rigid mountain bikes and gravel bikes. The defining feature is drop-style handlebars that flare outward at the ends offering similar hand positions to road bikes but with better control and stability. They fit wide plus-size tires and are usually designed for loaded riding and long days. They’re a great choice for riders who love gravel and dirt roads with occasional singletrack mixed in.
Gravel bikes: Gravel bikes bring the speedy ethos of road riding to dirt. Compared to road bikes they offer more stable geometry, wider tire clearance, more durable frames, wider and lower gearing, and sometimes wider flared drop bars. Compared to mountain bikes they’re lighter, less agile, and encourage a more forward-leaning posture. They’re a great choice for riders seeking one bike for both pavement and well-maintained unpaved roads, but they won’t inspire much confidence on rougher terrain like jeep roads or singletrack.
eBikes: Thanks to recent advances in battery technology, the pedal-assist eBike is now a practical way to make bikepacking accessible to more people. Land access rules for eBikes can vary, so check if they’re permitted before planning your ride.
The bike you already have: You’ll hear it often, even from bikepacking veterans: the best bike for your trip is the bike in your garage. In the scrappy and self-reliant world of bikepacking, the spirit of “run what you brung” isn’t just tolerated, it’s admired.
What to Look For
Whether you’re shopping for a brand new ride or making a few upgrades to a bike you already own, here are the biggest factors to consider.
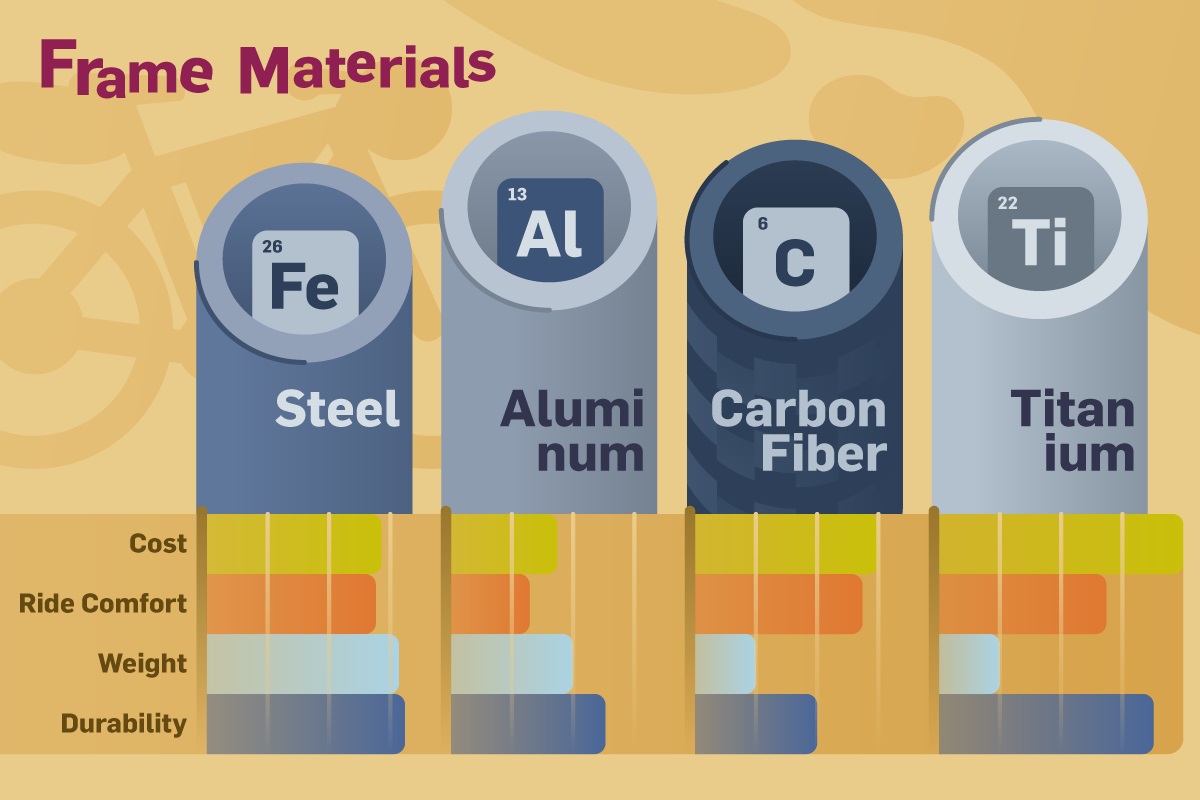
Frame Material
Any frame material will work, and budget is often the determining factor, but if you’re seeking a bikepacking-focused rig, it’s worth considering some pros and cons.
Steel is a solid choice, literally and figuratively, for its strength, affordability, ride comfort, and relative ease of repair. They’re very common in bikepacking and a great choice for almost any type of riding, but they especially excel under rugged conditions, heavy loads, and the demands of multi-country tours.
Aluminum bike frames are usually the most affordable option, and often a bit lighter than steel. They tend to have a harsher feel on bumpy surfaces. Aluminum is slightly more prone to breaking under unusually high stress and harder to repair than steel. Aluminum can be a great material for affordable hardtails in particular, since the front suspension compensates for the stiffer material.
Carbon bike frames are appreciated for their lighter weight and vibration-absorbing comfort, but these benefits come with a hefty price tag and weight limits. Carbon is common among road and gravel bikes, but within the bikepacking world, it’s used mainly by riders focused on long-distance self-supported racing.
Titanium frames are very strong, corrosion-resistant, and a comfortable ride, but they’re also quite expensive. Titanium bikes are relatively uncommon and mainly used by bikepackers seeking a premium frame that’s more durable than carbon.
Wheel Size
Two wheels that roll are all you really need, but wheel size does have some nuance. Mountain bike wheels are typically 26”, 27.5”, or 29” diameter, while road and many gravel bike wheels are labeled 650c or 700c. Note that 650c is the same diameter as 27.5”, and likewise for 700c / 29”, though the road equivalents tend to have narrower rim widths.
Which wheel size is best for bikepacking? It depends on how you like to ride and, especially for shorter riders, how you plan to carry your gear. Small frames with large 29er wheels often lack clearance for seat bags and handlebar bags, which is an important consideration for those wanting to run a traditional bikepacking bag setup.
For everyone else, the difference between 27.5″ and 29″ wheels is a minor matter of handling. In general, 29ers feel slightly more stable and excel at maintaining forward momentum, while 27.5” wheels feel a bit more responsive and quick to accelerate.
Traditionally 26” wheels were considered the global standard, favored by long-distance riders who might need to replace a wheel in a far-away land. These days standards are evolving, many bike components are available globally.
Tires
Tires are one of the easiest things to change, and one of the most important factors in handling and ride comfort on varied terrain. Tires designed for off-pavement use are wider and have knobbier tread for a smoother ride and better traction on dirt.
Most bikepacking routes roll well on 2” or wider tires, with rougher technical routes or loose sand providing a good excuse for even beefier 2.5” or wider “plus” tires. Look for tires designed for gravel riding or mountain biking. Avoid lightweight racing-focused models in favor of durable tires that can stand up to long, loaded rides.
Your frame and rims will constrain your tire options. Fork clearance and rim width limit how wide you can go, and the tire diameter must match your wheel size.
If tubeless-compatible rims are an option, we definitely recommend them. A tubeless setup is highly puncture resistant and allows lower tire pressure for improved traction and comfort. You can tackle the tubeless setup at home with a bit of patience or your local mechanic can do it. Going tubeless isn’t strictly necessary unless you do a lot of riding in the desert, where cactus spines and thorns can have you patching tubes left and right.
Brakes
Most modern mountain bikes use disc brakes, either hydraulic or mechanical. Hydraulic disc brakes are more expensive and feel a tad more responsive, but well-adjusted mechanical disc brakes work very well and are simpler to maintain. Rim brakes, though a bit less confidence-inspiring on technical descents, are perfectly effective for many types of bikepacking.
Whichever type of brakes you have, the top of a big descent is a bad time to realize your brake pads are worn or poorly adjusted. Have a bike shop look them over before your first trip. It’s also well worth learning how to check, adjust, and replace the pads yourself, and it’s not as difficult as it might seem.
Gears
Hit your first steep dirt climb on a loaded bike and you’ll understand why bikepacking rigs tend to have low gearing. This means the number of teeth on your front chainrings and rear cassette allow you to pedal with (relative) ease while climbing a steep hill. They also tend to have a wide range, meaning you’ll have many gears to choose from.
Wide and low gearing is helpful on routes with lots of climbing. But if your bike isn’t designed with this in mind or you ride mostly in flat areas, no worries, you can just get off and walk the occasional steep sections. Gear range can usually be modified up to a point, so if your bike lacks a low enough “granny gear,” ask your local bike shop to recommend options.
Saddle
Saddle (dis)comfort might be the most infamous topic in long-distance cycling. A bit of tenderness is expected on long days, but escalating saddle sores on a multi-day trip are torture. Often the stock saddle on a new bike is intended to be replaced by the rider’s preferred model, so don’t be surprised if it’s not right for you.
To improve your odds of a pleasant trip, you’ll need to find a saddle that fits your body and do a few long test rides to uncover any lurking issues. Comfort depends on bone structure, riding posture, and individual anatomy. Try to find a bike shop that will let you test ride a few, and make sure your seat position is adjusted properly, otherwise no saddle in the world will be good enough.
Cargo and Gear Mounts
Bikes designed for bikepacking often have mounting bolts in all the right places, but this is far from essential. Most bikepacking bags attach directly to the frame rather than on mounts. If you do need to mount a bottle cage to your frame without bolts, electrical tape or hose clamps can work wonders.
Handlebars
Mountain bikes usually have wide flat handlebars because they offer the best control on rough terrain. Some bikepackers find this hand position uncomfortable for long rides and prefer the flexibility of drop bars, especially the wider flared models designed for off-pavement adventures.
Slapping flat MTB-style bars on a road bike often leads to awkward geometry and requires different shifters and brakes, but flared “dirt drop” handlebars are an easy swap and greatly improve stability.
Pedals
If you currently ride with platform pedals, they’re perfect for bikepacking. On longer trips and/or especially rugged terrain, it’s important to have shoes you can walk in.
If you already ride with SPD / clipless pedals, you can use them for bikepacking with a couple considerations. Most bikepackers prefer the 2 bolt MTB style, which has recessed cleats allowing for (almost) normal walking. Single-sided SPD pedals (click-in on one side, platform on the other) offer the flexibility to ride unclipped on tough terrain, or in your camp sandals in hot weather.
Maintenance
If sprucing up your own bike or buying a used one, it’s worth visiting a local mechanic for a quick inspection and tune-up. They’ll hopefully catch any lurking issues that could disrupt your ride, and might be able to suggest some small modifications that could make a big difference for bikepacking.
Bike Alignment
Take the time to adjust seat height and tilt, as well as forward-backward position, with the help of an online guide or preferably a local bike shop. You might also consider raising the handlebars or at least tilting the brake hoods backward on road or gravel bikes to allow a more comfortable upright posture. Small adjustments can make a huge difference in comfort.
Where to Buy
There are deals to be had on eBay and Craigslist, and enthusiast forums around the internet feature lively classifieds sections, but it’s hard to beat a local bike shop (LBS). Find a good one and you have a partner in adventure, a trusted mechanic, and — in many cases — a like-minded community of riders orbiting around the shop. No LBS in your neck of the woods? Direct-to-consumer options are widespread and offer very competitive pricing, though they can’t help you out when assembly, maintenance, or random advice is required.
Renting a Bike
If you’re still shopping around, saving money for a purchase, or don’t want to transport your bike to a faraway place, renting is a great option. Near popular routes or mountain bike trails, you can often find bike shops that rent by the day; a few even rent bikepacking-specific bags and gear too.
This is a great way to try out different bikes and gear before buying. Be sure to ask about frame size, cargo mounting options, and tools and spares, and bring your own saddle if you have one you like.